
Crunchy Signature Chocolate Mixed Nut Cups Recipe
These Crunchy Signature Chocolate Mixed Nut Cups are a delightful treat that combines the rich, creamy goodness of chocolate with the satisfying crunch of mixed nuts. Perfect for a sweet snack or a simple dessert, these cups are super easy to whip up and will become a favorite in your everyday cooking rotation. With just a few ingredients, you can create a bite-sized indulgence that’s sure to impress family and friends!
Why You’ll Love This Recipe
- Quick and Easy: Just melt, mix, and set—no complicated techniques required!
- Customizable: Switch up the nuts or chocolate to suit your taste or what you have on hand.
- Perfect for Sharing: These cups make charming gifts or party treats.
- Healthy-ish Indulgence: Packed with nuts for protein and healthy fats, they balance the sweetness of chocolate.
- No Baking Needed: Great for hot days when the last thing you want to do is turn on the oven!
Ingredients
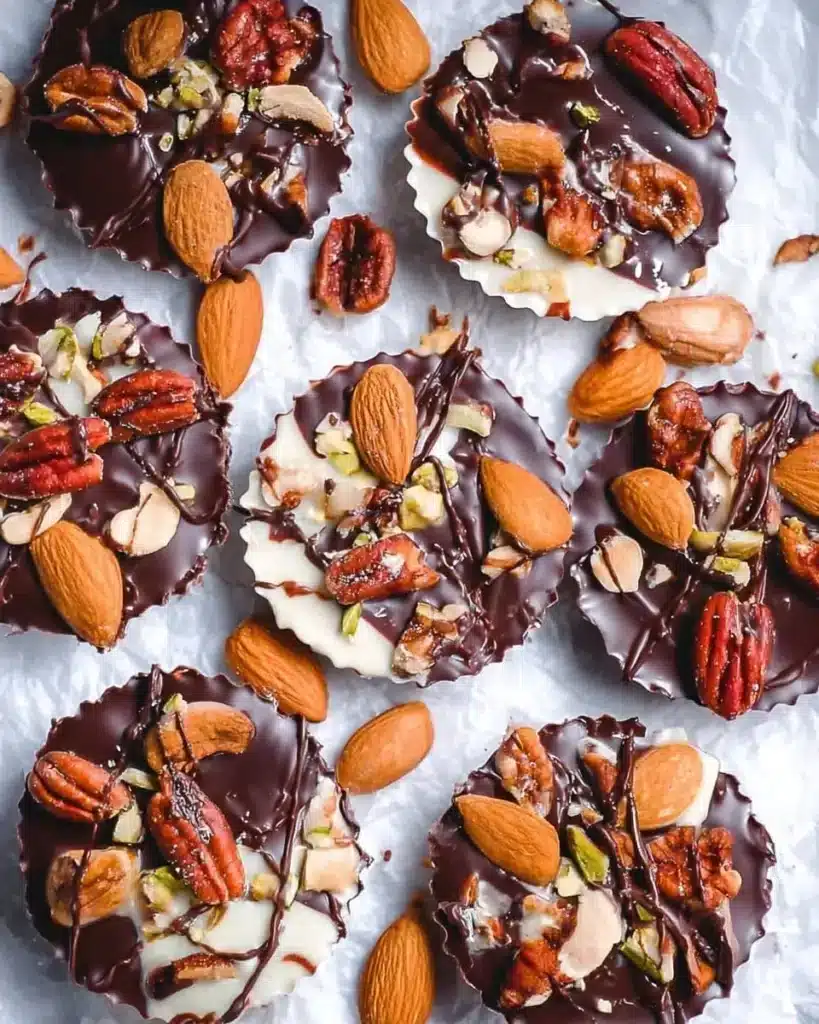
- Mixed Nuts: A combination of your favorites like almonds, cashews, and walnuts—great for crunch! Feel free to substitute with seeds for a nut-free version.
- Dark Chocolate: Rich and velvety, it’s the heart of these cups. Milk chocolate can be used for a sweeter option.
- Coconut Oil: Helps to thin the chocolate for easy pouring and gives a lovely sheen. You can replace it with butter if you prefer.
- Sea Salt: A sprinkle on top enhances the flavors of the chocolate and nuts beautifully.
Full measurements are in the recipe card below.
How to Make the Recipe
-
Melt the Chocolate: In a microwave-safe bowl, combine dark chocolate and coconut oil. Heat in 30-second intervals, stirring in between, until completely melted and smooth.
-
Prep the Cups: Line a muffin tin with cupcake liners. This will make it easy to remove the cups later on.
-
Combine the Nuts: In a separate bowl, mix your chosen nuts. Feel free to chop larger nuts for more texture or leave them whole!
-
Layer the Chocolate: Pour a thin layer of melted chocolate into the bottom of each liner, just enough to cover the base.
-
Add the Nuts: Spoon a generous amount of mixed nuts into each cup, pressing them down slightly into the chocolate.
-
Top with More Chocolate: Pour more melted chocolate over the nuts until they’re completely covered. Give a gentle tap on the muffin tin to flatten out the tops.
-
Finish with Sea Salt: Sprinkle a tiny pinch of sea salt on each cup for that touch of gourmet!
-
Chill to Set: Place the muffin tin in the fridge for about 1-2 hours, or until the chocolate is fully set.
Pro Tips for Making the Recipe
- Mix it Up: Experiment with different nuts, dried fruits, or even a sprinkle of cinnamon for a unique twist!
- Chop It Right: For a prettier presentation, chop larger nuts into smaller pieces, but avoid crushing them too finely.
- Keep it Warm: If your chocolate starts to thicken while you work, give it a quick pop back into the microwave to soften.
- Use Quality Chocolate: The better the chocolate, the better the flavor! Choose a brand you love.
- Don’t Skip the Salt: That little bit of sea salt really elevates the flavor, balancing the sweetness beautifully.
How to Serve
Enjoy these delicious chocolate nut cups on their own as a snack, or serve them alongside fresh fruit or a scoop of vanilla ice cream for a decadent dessert. They also make wonderful additions to a brunch spread or a delightful gift for friends and family!
Make Ahead and Storage
- Fridge Storage: Store any leftovers in an airtight container in the fridge for up to a week.
- Freezing: You can freeze these cups for up to 2 months. Just ensure they’re sealed properly to keep out moisture.
- Reheating Tips: If frozen, allow them to thaw at room temperature. Enjoy them cold, or pop in the microwave for 5-10 seconds—just enough to soften slightly.
FAQs
Can I use other types of chocolate?
Yes! You can use milk, white, or even flavored chocolates like hazelnut for a fun twist.
What nuts work best for this recipe?
Any nuts you like! Almonds, pecans, and cashews are all excellent choices. Just avoid overly oily nuts.
Can I make these nut-free?
Absolutely! Substitute the nuts with a mix of seeds like pumpkin and sunflower seeds for a similar crunch.
Can I add ingredients like dried fruit or coconut?
Yes, definitely! Dried cranberries, cherries, or shredded coconut can add a lovely flavor and texture!
Enjoy making these Crunchy Signature Chocolate Mixed Nut Cups! They’re sure to become a beloved recipe in your kitchen.
Crunchy Signature Chocolate Mixed Nut Cups
Ingredients
Method
- In a microwave-safe bowl, combine dark chocolate and coconut oil. Heat in 30-second intervals, stirring in between, until completely melted and smooth.
- Line a muffin tin with cupcake liners to make it easy to remove the cups later on.
- In a separate bowl, mix your chosen nuts. Feel free to chop larger nuts for more texture or leave them whole.
- Pour a thin layer of melted chocolate into the bottom of each liner, just enough to cover the base.
- Spoon a generous amount of mixed nuts into each cup, pressing them down slightly into the chocolate.
- Pour more melted chocolate over the nuts until they’re completely covered. Give a gentle tap on the muffin tin to flatten out the tops.
- Sprinkle a tiny pinch of sea salt on each cup for that gourmet touch.
- Place the muffin tin in the fridge for about 1-2 hours, or until the chocolate is fully set.