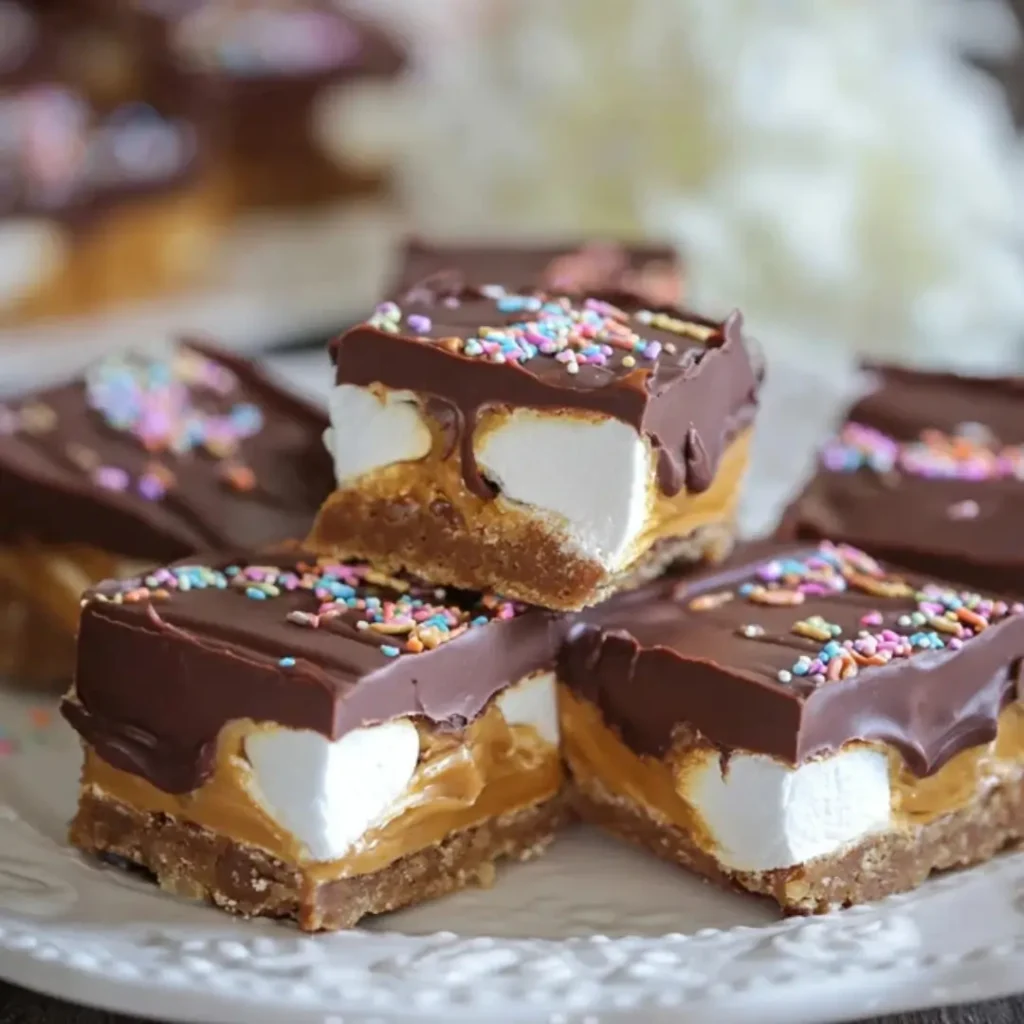
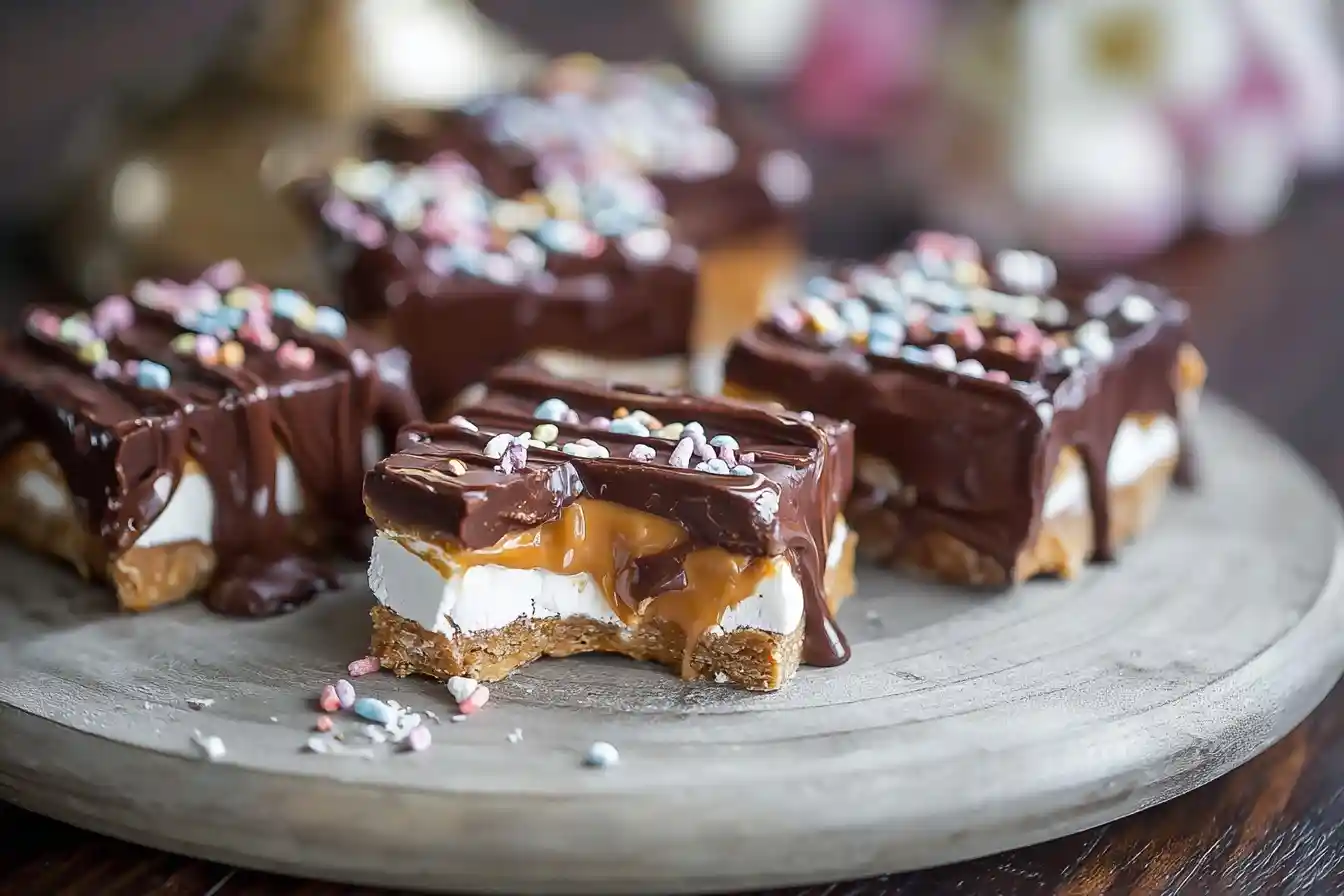
Oh, sweet friends, do you remember those childhood days when a simple treat could feel like the most magical creation? That’s exactly the feeling I get with these Marshmallow Peanut Butter Chocolate Bliss Bars. They’re a symphony of textures and flavors – the crunchy graham cracker crust, the creamy peanut butter, fluffy marshmallow, and a rich chocolate topping that just melts in your mouth. It’s a no-bake wonder that truly embodies sweet bliss.
I can almost hear my grandmother’s gentle chuckle as she’d tell me stories about making simpler versions of these treats, long before fancy ovens were common. My own kitchen has seen countless experiments, and some of my fondest memories involve perfecting these kinds of layered desserts, sharing slices with eager friends and family, watching their eyes light up with each bite.
This recipe is not just incredibly easy to whip up, making it perfect for busy afternoons, but it’s also a total crowd-pleaser, guaranteed to bring smiles to any gathering. My top tip for any no-bake bar is always to gather all your ingredients beforehand – it makes the process so much smoother and more enjoyable!
What You Need to Make This Recipe
Crafting these delightful no-bake bars requires just a handful of simple ingredients, many of which you likely already have in your pantry. We’re talking about the magic of creamy peanut butter and luscious chocolate chips coming together, bound by a buttery graham cracker crust, and topped with those adorable mini marshmallows. It’s truly a testament to how humble ingredients can create something extraordinary like these Marshmallow Peanut Butter Chocolate Bliss Bars. You’ll find the full list of ingredients and precise measurements waiting for you in the recipe card below.
How to Make Marshmallow Peanut Butter Chocolate Bliss Bars
Making these bars is a journey of delightful layers, each one building to a crescendo of flavor and texture. We start by pressing down a buttery graham cracker crust, then spread a rich, sweet peanut butter layer, followed by a light and airy marshmallow topping. Finally, a decadent chocolate ganache crowns our creation before it chills into perfect slices of Marshmallow Peanut Butter Chocolate Bliss Bars. It’s a joyful process that’s far simpler than it sounds, and I promise, you’ll feel like a kitchen wizard!
Marshmallow Peanut Butter Chocolate Bliss Bars
Ingredients
Equipment
Method
- Line a 9×13 inch baking pan with parchment paper, leaving an overhang on the sides for easy removal.
- In a large mixing bowl, combine graham cracker crumbs, melted butter, and granulated sugar. Mix until well combined and moist.
- Press the mixture evenly into the bottom of the prepared baking pan. For a slightly sturdier crust, you can bake it at 350°F (175°C) for 8-10 minutes, then let it cool completely. Otherwise, simply chill for 15 minutes.
- In a large mixing bowl, using an electric mixer, beat together creamy peanut butter and softened unsalted butter until smooth.
- Gradually add the sifted powdered sugar, beating until fully incorporated and creamy. Add the vanilla extract and mix until just combined.
- Evenly spread the peanut butter mixture over the cooled or chilled graham cracker crust.
- In a medium saucepan over low heat, melt the mini marshmallows and 2 tablespoons of unsalted butter, stirring constantly until smooth and gooey. Be careful not to scorch them. Alternatively, you can melt them in a microwave-safe bowl in 30-second intervals, stirring in between, until smooth.
- Quickly and carefully spread the melted marshmallow mixture evenly over the peanut butter layer. It will be very sticky. You can lightly grease your spatula with a little butter or cooking spray to help with spreading.
- In a microwave-safe bowl, combine semi-sweet chocolate chips and heavy cream. Microwave for 30 seconds, stir, then microwave in 15-second intervals, stirring after each, until the chocolate is completely melted and smooth. Alternatively, melt over a double boiler.
- Pour the melted chocolate ganache over the marshmallow layer, spreading it gently and evenly to cover the entire surface.
- Refrigerate the bars for at least 2 hours, or until the chocolate topping is firm and the layers are set.
- Once firm, use the parchment paper overhang to lift the bars out of the pan. Place on a cutting board and cut into 24 squares (or desired size).
- Store leftover bars in an airtight container in the refrigerator for up to 5 days.
Notes
Pro Tips for Making This Marshmallow Peanut Butter Chocolate Bliss Bars
Baking should always feel like a joyful adventure, and with these Marshmallow Peanut Butter Chocolate Bliss Bars, a few little tricks can make all the difference. I’ve learned these over years of mixing and melting, and I’m so happy to share them with you!
- My Secret Trick: For a truly smooth peanut butter layer, I always slightly warm my peanut butter in the microwave for about 15-20 seconds before mixing it with the powdered sugar. It makes it so much easier to spread evenly and helps avoid any clumps.
- When pressing the graham cracker crust, use the bottom of a flat-bottomed glass or a measuring cup to get it really compact. This ensures a sturdy base that won’t crumble when you cut into your delicious bars.
- Don’t rush the chilling time! I know it’s tempting to dive right into these treats, but allowing the bars to chill for at least 2-3 hours, or even overnight, is crucial. This helps all the layers set properly, making for clean, beautiful slices of your Marshmallow Peanut Butter Chocolate Bliss Bars.
- For the chocolate topping, ensure your heavy cream is hot, but not boiling, when you pour it over the chocolate chips. Let it sit for a minute before stirring; this allows the chocolate to melt completely, resulting in a perfectly smooth and glossy ganache.
Fun Variations for Marshmallow Peanut Butter Chocolate Bliss Bars
One of the things I love most about home baking is the freedom to play and personalize, and these bars are just begging for a little creative flair! While the classic Marshmallow Peanut Butter Chocolate Bliss Bars are truly divine, here are a few ideas to make them uniquely yours.
- Nutty Delights: If you’re a fan of different nuts, consider adding a sprinkle of chopped peanuts, walnuts, or pecans to the crust or even over the chocolate topping for an extra crunch. My friend often asks for a mix of salted peanuts in the peanut butter layer for that irresistible sweet and salty combo.
- Dark Chocolate Dream: For those who prefer a richer, less sweet experience, swap out the semi-sweet chocolate chips for dark chocolate. A 70% cacao dark chocolate ganache elevates the Marshmallow Peanut Butter Chocolate Bliss Bars to a more sophisticated indulgence.
- Festive Sprinkles: These bars are wonderful for any occasion, and a colorful scattering of sprinkles over the still-wet chocolate topping can instantly make them festive! My nieces absolutely adore when I add rainbow sprinkles, turning them into a party in a pan.
- Swirls of Joy: Before the chocolate sets, you could gently swirl in a tablespoon or two of melted caramel sauce or even a raspberry jam for an extra layer of flavor and a beautiful marbled effect. It adds a lovely surprise to each bite.
What to Serve With Marshmallow Peanut Butter Chocolate Bliss Bars
These Marshmallow Peanut Butter Chocolate Bliss Bars are quite a complete dessert on their own, a symphony of flavors and textures in every square. However, there are a few simple accompaniments that can truly elevate the experience and make them feel even more special.
I love serving these bars with a tall glass of cold milk, which instantly brings me back to childhood afternoons. For a slightly more grown-up pairing, a hot cup of coffee or a rich espresso makes a wonderful complement, the bitterness cutting through the sweetness of the bars beautifully. My mom always pairs them with hot cocoa in winter, a truly comforting duo. If you’re feeling fancy, a small scoop of vanilla bean ice cream melting alongside a square of these bars is pure heaven, or a dollop of freshly whipped cream can add a touch of airy elegance. Sometimes, a simple garnish of fresh berries, like raspberries or strawberries, can offer a lovely, bright contrast to the richness.
How to Store Marshmallow Peanut Butter Chocolate Bliss Bars
Ensuring your homemade treats stay fresh and delicious is key, and these Marshmallow Peanut Butter Chocolate Bliss Bars are no exception. Proper storage helps maintain their delightful texture and flavor for days, making them perfect for preparing ahead or enjoying leftovers.
Fridge Storage
Once your Marshmallow Peanut Butter Chocolate Bliss Bars have fully set, the best way to store them is in an airtight container in the refrigerator. This keeps all the layers firm and prevents the chocolate from getting too soft. They will stay wonderfully fresh for up to 5-7 days. When I store them, I often place a piece of parchment paper between layers if I stack them, to prevent sticking.
Freezer Tips
Yes, these bars freeze beautifully! For longer storage, cut the bars into individual servings. Place them on a baking sheet lined with parchment paper and freeze until solid, about 1-2 hours. Then, transfer the frozen bars to an airtight freezer-safe container or a resealable freezer bag, again using parchment between layers. They’ll keep well for up to 2-3 months. Just let them thaw in the refrigerator or at room temperature for about 30 minutes before enjoying. My personal tip is to always label and date freezer bags – it saves so much guesswork later on!
Nutritional Benefits
While we mostly bake for joy and deliciousness, it’s always lovely to find a dessert that offers a little something extra. These Marshmallow Peanut Butter Chocolate Bliss Bars, with their inclusion of peanut butter, offer a lovely touch of protein and healthy fats. It’s a wonderful example of how combining simple, wholesome ingredients can create a treat that’s both satisfyingly indulgent and a little bit nourishing.
FAQs
Faq 1
Can I use a different type of peanut butter for Marshmallow Peanut Butter Chocolate Bliss Bars?
Absolutely! While creamy peanut butter is recommended for the smoothest texture, you can use natural peanut butter. Just be sure to stir it very well before using, as natural varieties often separate. Avoid chunky peanut butter for the middle layer, as it might make it harder to spread.
Faq 2
How long do Marshmallow Peanut Butter Chocolate Bliss Bars need to chill?
For the best results and clean slices, your Marshmallow Peanut Butter Chocolate Bliss Bars should chill in the refrigerator for at least 2 to 3 hours. Overnight is even better if you have the time! This allows all the layers to firm up completely.
Faq 3
Can I freeze Marshmallow Peanut Butter Chocolate Bliss Bars?
Yes, these bars freeze wonderfully! After they’ve fully set and been cut, place them in an airtight freezer-safe container, separating layers with parchment paper. They will keep well for up to 2-3 months. Thaw them in the refrigerator or at room temperature.
Faq 4
What if I don’t have graham cracker crumbs for the crust?
No problem! You can easily substitute graham cracker crumbs with crushed digestive biscuits, vanilla wafers, or even shortbread cookies. Just make sure you have the same quantity of crumbs for the base of your Marshmallow Peanut Butter Chocolate Bliss Bars.
Conclusion
Creating and sharing homemade desserts is truly one of life’s sweetest pleasures, and these Marshmallow Peanut Butter Chocolate Bliss Bars embody that joy perfectly. They are a delightful reminder that with a little love and patience, even the simplest ingredients can transform into magical treats that bring smiles and create lasting memories. So, gather your ingredients, let your heart guide your hands, and share a taste of this blissful creation with those you love. Happy baking, sweet friends!