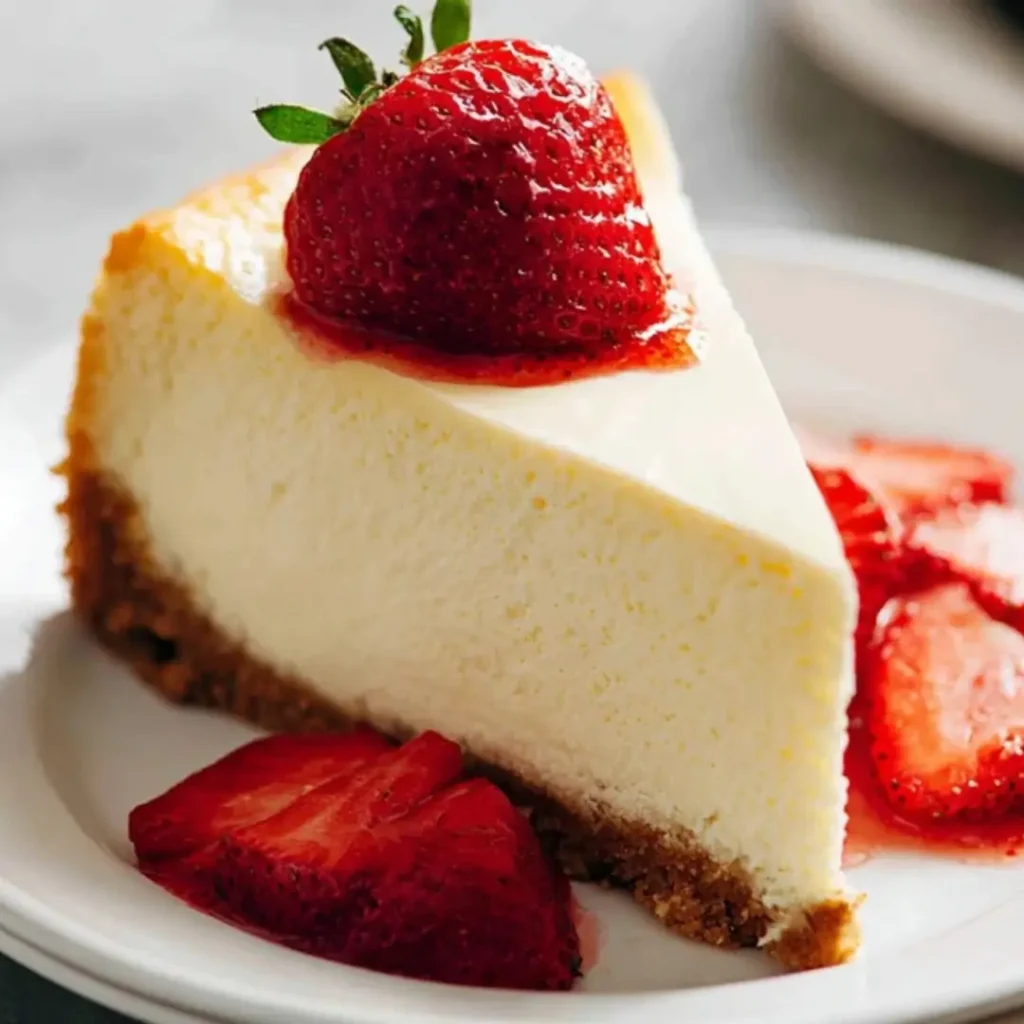
Oh, the sheer delight of a truly wonderful cheesecake! There’s something so inherently comforting and celebratory about a Classic Cheesecake, isn’t there? That perfect balance of creamy richness, a hint of tang, and a sturdy, buttery graham cracker crust just sings of indulgence. It’s a dessert that always feels special, yet with this recipe, I promise it’s wonderfully approachable for any home baker yearning to create magic in their kitchen.
I still remember my grandmother, apron dusted with flour, teaching me to gently press graham cracker crumbs into the pan for our family’s holiday dessert. The aroma of vanilla and lemon zest filling her kitchen as the cheesecake baked became a treasured memory. That early spark truly ignited my love for transforming simple ingredients into something extraordinary.
This recipe is not only incredibly easy to bake, making it perfect for both seasoned bakers and newcomers, but it’s also a fantastic family-friendly treat that always brings smiles. My top tip for any cheesecake? Patience in chilling is key – it’s worth every single moment for that perfect, firm slice!
What You Need to Make This Recipe
Crafting this delightful dessert relies on a few simple yet essential ingredients. Cream cheese forms the luscious heart of our creation, while fresh lemon zest adds a bright, essential counterpoint to its richness, making every bite of this Classic Cheesecake perfectly balanced. You’ll find the full list of ingredients and precise measurements in the recipe card below, ready for your baking adventure!
How to Make Classic Cheesecake
Whipping up this creamy dream starts with preparing a simple, buttery graham cracker crust that’s pressed into your springform pan. Next, you’ll create the silky smooth filling by blending the cream cheese with sugars, eggs, and flavorings until it’s just right. After a gentle bake and a gradual cool down, it’s time for the hardest part: letting it chill completely to achieve that iconic texture.

Classic New York Cheesecake
Ingredients
Equipment
Method
- Preheat your oven to 350°F (175°C). Wrap the outside bottom and sides of a 9-inch springform pan tightly with several layers of heavy-duty aluminum foil to prevent water from seeping in during the water bath.
- In a medium bowl, combine the graham cracker crumbs, 1/4 cup granulated sugar, and melted butter. Mix until well combined and the mixture resembles wet sand.
- Press the crumb mixture evenly into the bottom of the prepared springform pan. Bake for 10 minutes, then remove from oven and let cool slightly while you prepare the filling.
- Reduce oven temperature to 325°F (160°C).
- In the bowl of a stand mixer fitted with the paddle attachment (or using a hand mixer), beat the room temperature cream cheese on medium speed until smooth and creamy, about 2-3 minutes. Scrape down the sides of the bowl.
- Gradually add the 1 1/2 cups granulated sugar and cornstarch, beating on low speed until just combined. Be careful not to overmix, as this can incorporate too much air, leading to cracks.
- Add the vanilla extract and lemon zest, mixing until just incorporated.
- Add the eggs one at a time, mixing on low speed after each addition until just combined. Do not overmix; stop as soon as the yolk disappears. Overmixing eggs can also cause cracks.
- Gently fold in the sour cream and heavy cream until fully incorporated and the batter is smooth. Do not use an electric mixer for this step.
- Pour the cheesecake filling over the cooled crust in the springform pan.
- Place the foil-wrapped springform pan into a larger roasting pan. Carefully pour hot water into the roasting pan until it reaches about halfway up the sides of the springform pan (this is the water bath).
- Carefully transfer the roasting pan with the cheesecake to the preheated oven. Bake for 60-70 minutes, or until the edges are set and lightly golden, but the center still has a slight jiggle (about a 2-inch circle in the middle).
- Once baked, turn off the oven and prop the oven door open with a wooden spoon. Let the cheesecake cool in the oven for 1 hour. This slow cooling prevents cracking.
- Carefully remove the cheesecake from the water bath and the roasting pan. Remove the aluminum foil. Let it cool completely on a wire rack at room temperature for another 1-2 hours.
- Once completely cool, cover the cheesecake loosely with plastic wrap and refrigerate for at least 6-8 hours, or preferably overnight, before serving. Chilling is crucial for the cheesecake to firm up and develop its full flavor and texture.
- Before serving, run a thin knife around the edge of the pan before releasing the springform ring. Serve plain or with your favorite toppings like fresh berries or fruit compote.
Notes
Achieving that perfect, crack-free, silky smooth Classic Cheesecake doesn’t require magic, just a few helpful tricks I’ve gathered over the years!
- Room Temperature Ingredients: This is absolutely vital! Ensure your cream cheese, eggs, and sour cream are at room temperature. It makes for a much smoother, lump-free batter, preventing overmixing which can introduce too much air.
- Don’t Overmix: Once you add the eggs, mix on low speed just until combined. Overmixing incorporates too much air, which can cause cracks when the cheesecake cools and deflates. A gentle hand is your friend here.
- The Water Bath (Bain-Marie): I always recommend using a water bath for cheesecakes. It creates a moist, even heat environment that helps the cheesecake bake slowly and prevents cracking. Wrap your springform pan tightly with foil to keep water out.
- My Secret Trick: My top tip is to always let your cheesecake cool slowly. After baking, turn off the oven, crack the door open, and leave the cheesecake inside for about an hour. This gradual cooling prevents drastic temperature changes that lead to cracks.
Fun Variations for Classic Cheesecake
One of the joys of baking is getting creative! While our Classic Cheesecake is perfect as is, it also welcomes playful twists.
- Berry Swirl: My sister always asks me to swirl in a homemade raspberry or strawberry jam before baking. Just dollop spoonfuls of jam onto the top of the filling and gently swirl with a knife for beautiful ribbons of fruit.
- Chocolate Lover’s Dream: For a richer treat, melt about 4 oz of semi-sweet chocolate and swirl it into the batter before baking. You can also add a tablespoon of cocoa powder to the crust for a chocolate graham crust.
- Lemon Supreme: If you adore lemon, increase the fresh lemon zest slightly and add a tablespoon of fresh lemon juice to the filling. You can also finish with a simple lemon glaze after chilling.
- Espresso Kick: For coffee enthusiasts, dissolve a teaspoon of instant espresso powder in a tablespoon of hot water and add it to the cream cheese mixture for a subtle coffee flavor.
What to Serve With Classic Cheesecake
A slice of our beautiful Classic Cheesecake is a star on its own, but a few simple accompaniments can truly elevate the experience!
I absolutely love serving a chilled slice with a vibrant scattering of fresh berries – think plump raspberries, juicy blueberries, or sliced strawberries. Their tartness is a wonderful contrast to the rich creaminess. For something a little more indulgent, a drizzle of warm caramel sauce or a spoonful of homemade fruit compote adds another layer of flavor and texture. My mom always pairs it with a steaming mug of black coffee, saying it balances the sweetness perfectly. And for a quick serving idea? A dollop of lightly sweetened whipped cream is always a winner!
How to Store Classic Cheesecake
Knowing how to properly store your delightful Classic Cheesecake ensures every leftover slice tastes just as heavenly as the first.
Refrigerator Storage
Once completely cooled, cover your cheesecake loosely with plastic wrap or foil and store it in the refrigerator. It will stay wonderfully fresh and delicious for up to 5-7 days. I always recommend placing it in an airtight container if possible to prevent it from absorbing any other odors from the fridge.
Freezing for Later
Yes, you can absolutely freeze cheesecake! For best results, freeze the cheesecake uncovered until firm, about 2-3 hours. Then, wrap it tightly in several layers of plastic wrap, followed by a layer of aluminum foil. It can be stored in the freezer for up to 1 month. When you’re ready to enjoy, simply thaw it in the refrigerator overnight.
Nutritional Benefits
While often seen as a delightful indulgence, this Classic Cheesecake can offer a few surprising benefits too. Made with wholesome ingredients like cream cheese, it provides a good source of protein and calcium. When enjoyed in moderation, it’s a wonderfully satisfying treat that perfectly balances indulgence with simple, nourishing components, proving that a dessert can be both delightful and bring a little goodness!
FAQs
Faq 1
Why does my cheesecake crack on top?
Cracks often occur from sudden temperature changes. To prevent this, bake your Classic Cheesecake in a water bath and let it cool slowly in the oven with the door ajar after baking.
Faq 2
Can I use a different type of crust?
Absolutely! While a graham cracker crust is classic, you can experiment. Consider a crushed oreo cookie crust for a chocolate twist, or even a shortbread cookie crust for a buttery alternative with your Classic Cheesecake.
Faq 3
How long does cheesecake need to chill?
For the best texture and stability, your Classic Cheesecake needs to chill for a minimum of 6-8 hours, but ideally overnight. This allows it to set completely, ensuring perfect slices.
Faq 4
Can I freeze individual slices?
Yes! Once your Classic Cheesecake is completely chilled, slice it into individual portions. Wrap each slice tightly in plastic wrap, then foil, and store in an airtight container in the freezer for a quick, delightful treat anytime.
Conclusion
There’s truly nothing quite like the joy of sharing a homemade dessert, especially a perfectly baked Classic Cheesecake. It’s a labor of love that rewards you with creamy, dreamy slices that bring smiles to everyone’s faces. I hope this recipe inspires you to embrace the warmth and wonder of your own kitchen, creating not just a dessert, but sweet memories with every comforting bite. Happy baking, my friends!