Oh, sweet friends, there’s truly nothing quite like the comforting aroma of a homemade Biscoff Cake wafting through the kitchen. This dreamy dessert, with its moist, tender crumb and irresistible cookie butter frosting, is more than just a cake; it’s a warm hug in every slice, a little piece of magic that comes alive with simple ingredients and a dash of love. It reminds us that baking at home is where the truest joy, and the most delicious flavors, are found.
I remember my grandmother, with flour dusting her apron, teaching me that the best desserts are made with patience and a dash of curiosity. Experimenting with flavors was always her favorite part, and in my own kitchen, this Biscoff Cake has become a testament to those cherished lessons, often delighting friends and family with its unique, comforting taste.
This recipe is wonderfully approachable for bakers of all levels, promising a stunning center-piece that’s perfect for celebrations or simply making an ordinary Tuesday feel extraordinary. My top tip for any cake, including this one, is to always ensure your butter and eggs are at room temperature for the smoothest batter and best rise!
What You Need to Make This Recipe
Crafting this delightful cake brings together some truly wonderful ingredients, each playing a crucial role in its irresistible charm. We’re talking about the creamy Biscoff spread that infuses every bite with its signature caramelized spice, perfectly balanced with the richness of unsalted butter and the tang of buttermilk, ensuring a supremely moist crumb. I always believe that using the best quality ingredients, especially vanilla extract, truly elevates a Biscoff Cake to something truly special. For the full list of ingredients and precise measurements, you’ll find everything in the recipe card just below.
How to Make Biscoff Cake
Making this Biscoff Cake is a joyful journey through three simple stages, much like creating a cherished memory. First, we’ll lovingly prepare the tender cake layers, infusing them with that iconic Biscoff flavor that’s so wonderfully unique. Next, we’ll whip up the lusciously creamy Biscoff buttercream frosting, a dreamy concoction that’s truly the star of the show. Finally, with a little creative flair, we’ll assemble and decorate our beautiful cake, ready to be admired and, of course, devoured!

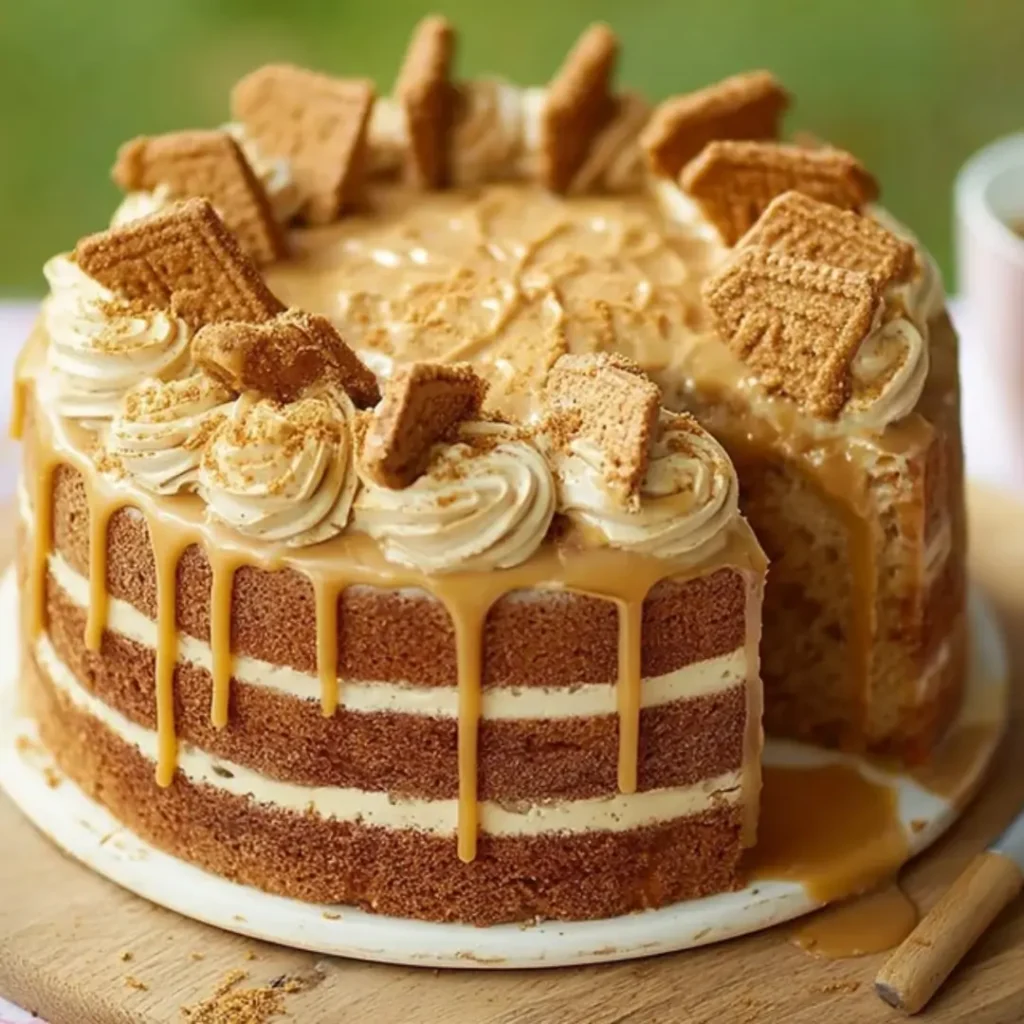
Ultimate Biscoff Dream Cake
Ingredients
Equipment
Method
- Preheat your oven to 350°F (175°C). Grease and flour two 8-inch round cake pans, then line the bottoms with parchment paper. This ensures easy release.
- In a large bowl, whisk together the sifted all-purpose flour, granulated sugar, baking powder, baking soda, and salt. Set aside.
- In the bowl of a stand mixer fitted with the paddle attachment, cream the softened butter on medium speed until light and fluffy, about 2-3 minutes. Scrape down the sides of the bowl.
- Add the eggs one at a time, beating well after each addition until fully incorporated. Mix in the vanilla extract and 1/2 cup creamy Biscoff spread until smooth.
- Gradually add the dry ingredients to the wet ingredients in three additions, alternating with the buttermilk in two additions, beginning and ending with the dry ingredients. Mix on low speed until just combined, being careful not to overmix. Overmixing can lead to a tough cake.
- Divide the batter evenly between the prepared cake pans. Smooth the tops with a spatula.
- Bake for 30-35 minutes, or until a wooden skewer inserted into the center of the cakes comes out clean. The cakes should be lightly golden and spring back when gently pressed.
- Remove cakes from the oven and let them cool in the pans on a wire rack for 10-15 minutes before inverting them onto the wire rack to cool completely. Ensure cakes are entirely cool before frosting (at least 1 hour).
- In the bowl of a stand mixer fitted with the paddle attachment, beat the softened butter on medium-high speed for 3-5 minutes until very light and fluffy. This step is crucial for airy buttercream.
- Gradually add the sifted powdered sugar, 1 cup Biscoff spread, vanilla extract, and salt. Start on low speed to avoid a sugar cloud, then increase to medium-high and beat until combined and smooth.
- With the mixer running on low, slowly add 2 tablespoons of heavy cream or milk. Increase speed to medium-high and beat for another 2-3 minutes until light, fluffy, and spreadable. Add more cream/milk, a teaspoon at a time, if needed, to reach your desired consistency.
- Once the cake layers are completely cool, level them if necessary using a serrated knife for even layers.
- Place one cake layer on your serving plate or cake stand. Spread about 1 cup of Biscoff buttercream evenly over the top.
- Carefully place the second cake layer on top. Frost the top and sides of the entire cake with the remaining Biscoff buttercream, using an offset spatula to create smooth or decorative swirls.
- For garnish, gently press crushed Biscoff cookies around the base or top edge of the cake. If desired, melt 2-3 tablespoons of Biscoff spread in the microwave for 15-20 seconds until drizzly, then drizzle it over the top of the cake, letting some drip down the sides.
- Serve immediately or chill for best flavor and texture. Enjoy your Ultimate Biscoff Dream Cake!
Notes
Pro Tips for Making This Biscoff Cake
Oh, darling bakers, after years of whisking and wonderful messes in my kitchen, I’ve gathered a few cherished secrets that will help your Biscoff Cake turn out absolutely perfect every single time. These are the little touches that truly make a difference.
My Secret Trick: I always sift my dry ingredients together, not just to remove lumps, but because it ensures everything is perfectly aerated and evenly distributed. This makes for a lighter, more tender crumb in your finished cake, a difference you can truly taste!
Room Temperature is Key: Just as I mentioned in the intro, making sure your butter, eggs, and buttermilk are all at room temperature is non-negotiable for the best results. It helps the batter emulsify beautifully, giving you a smooth, uniform texture in your
Biscoff Cakelayers.Don’t Overmix: When you’re adding your dry ingredients to the wet, mix just until combined. Overmixing develops the gluten too much, which can lead to a tough, dry cake. A gentle hand is all you need for a perfectly tender
Biscoff Cake.Cool Completely: Patience is a virtue, especially in baking! Make sure your cake layers are completely cool before you even think about frosting them. Warm layers will melt your beautiful buttercream, and we don’t want any sad, sliding frosting.
Fun Variations for Biscoff Cake
One of the most enchanting things about baking, my dear friends, is the freedom to play and make a recipe truly your own! This Biscoff Cake is a wonderful canvas for creativity, and I’ve found so many delightful ways to adapt it that my friends and family adore.
Swirls of Sweetness
For an extra layer of flavor and a beautiful visual, try swirling in a touch of raspberry jam or even a rich caramel sauce into the batter just before baking. My sister, for instance, always asks me to swirl in a little extra creamy Biscoff spread into the cake batter itself – it creates delightful pockets of cookie butter goodness!
A Nutty Twist
If you’re a fan of nuts, finely chopped pecans or walnuts can be folded into the cake batter for a lovely textural contrast. A friend loves when I sprinkle some toasted pecans over the top of the frosted cake for a little crunch. Just imagine the delicious harmony with the Biscoff Cake!
Mini Marvels
This recipe can easily be adapted to make cupcakes. Just adjust the baking time to about 18-22 minutes for regular-sized cupcakes. They’re perfect for parties and so much fun for little hands to decorate.
What to Serve With Biscoff Cake
When I envision serving a slice of this magnificent Biscoff Cake, I always think about creating a moment of pure comfort and delight. It’s truly a showstopper on its own, but a few thoughtful accompaniments can elevate the experience beautifully.
I absolutely adore serving a generous slice with a scoop of rich vanilla bean ice cream. The cool creaminess against the spiced cake is simply heavenly! My mom, on the other hand, always pairs her slice with a steaming mug of hot cocoa during the colder months – it’s a match made in cozy heaven. For a lighter touch, especially if you’re looking for a quick serving idea, a simple dusting of powdered sugar or a few fresh berries, like raspberries or blackberries, can add a lovely freshness that cuts through the richness of the Biscoff Cake. And, of course, a good cup of coffee or herbal tea is always a welcome companion!
How to Store Biscoff Cake
After all the love you’ve poured into baking this amazing Biscoff Cake, you’ll want to make sure every last slice stays as fresh and delicious as possible! Proper storage is key to preserving its delightful flavor and moist texture.
For short-term storage, up to 3-4 days, I recommend keeping your Biscoff Cake in an airtight container at room temperature if your kitchen isn’t too warm. If you live in a warmer climate or if your cake contains fresh fruit or dairy beyond the frosting, it’s best to store it in the refrigerator. Just be sure to bring it to room temperature for about 30 minutes before serving for the best flavor and texture. My personal tip? I like to place a piece of plastic wrap directly over any cut surfaces before covering the cake to prevent it from drying out – it really helps lock in that moisture!
If you’ve managed to have some Biscoff Cake left over (a rare occurrence in my house!), it freezes beautifully for up to a month. Wrap individual slices or the entire cake tightly in plastic wrap, then an additional layer of foil, to prevent freezer burn. Thaw it overnight in the refrigerator, then bring to room temperature before enjoying.
Nutritional Benefits
While we often bake for joy and flavor, it’s lovely to know that our homemade treats can also offer a little something extra. This delicious Biscoff Cake, with its simple, wholesome ingredients like flour and eggs, provides a comforting energy boost. And while it’s certainly an indulgent treat, homemade desserts like this allow us to control the ingredients, ensuring a sweet delight that’s both satisfying and made with love. It’s a treat for the soul, and that, to me, is a wonderful benefit!
FAQs
Faq 1
Can I make this Biscoff Cake ahead of time?
Absolutely! You can bake the cake layers a day in advance, wrap them tightly, and store them at room temperature. The buttercream can also be made a day ahead and refrigerated; just re-whip it briefly before frosting.
Faq 2
What if I don’t have buttermilk for the Biscoff Cake?
No buttermilk? No problem! You can easily make a substitute by adding 1 tablespoon of lemon juice or white vinegar to a liquid measuring cup, then filling it with regular milk (dairy or non-dairy) to the 1-cup line. Let it sit for 5-10 minutes until it curdles slightly before using in your Biscoff Cake.
Faq 3
Why is my Biscoff Cake so moist?
The buttermilk and creamy Biscoff spread are key players! Buttermilk reacts with the baking soda to create a tender, moist crumb, while the Biscoff spread adds richness and locks in moisture, ensuring every bite is wonderfully soft and flavorful.
Faq 4
Can I make Biscoff Cake into cupcakes?
Yes, absolutely! This recipe adapts beautifully to cupcakes. Simply divide the batter among lined cupcake tins, filling each about two-thirds full. Bake for approximately 18-22 minutes, or until a toothpick inserted comes out clean.
Conclusion
Baking this Moist Biscoff Cake with Creamy Cookie Butter Frosting is more than just following a recipe; it’s an invitation to create warmth, share joy, and build sweet memories in your very own kitchen. I truly hope you’ll gather your ingredients, put on your favorite apron, and dive into the delightful process of bringing this cake to life. May every slice bring a smile to your face and a comforting sweetness to your home. Happy baking, my dear friends!