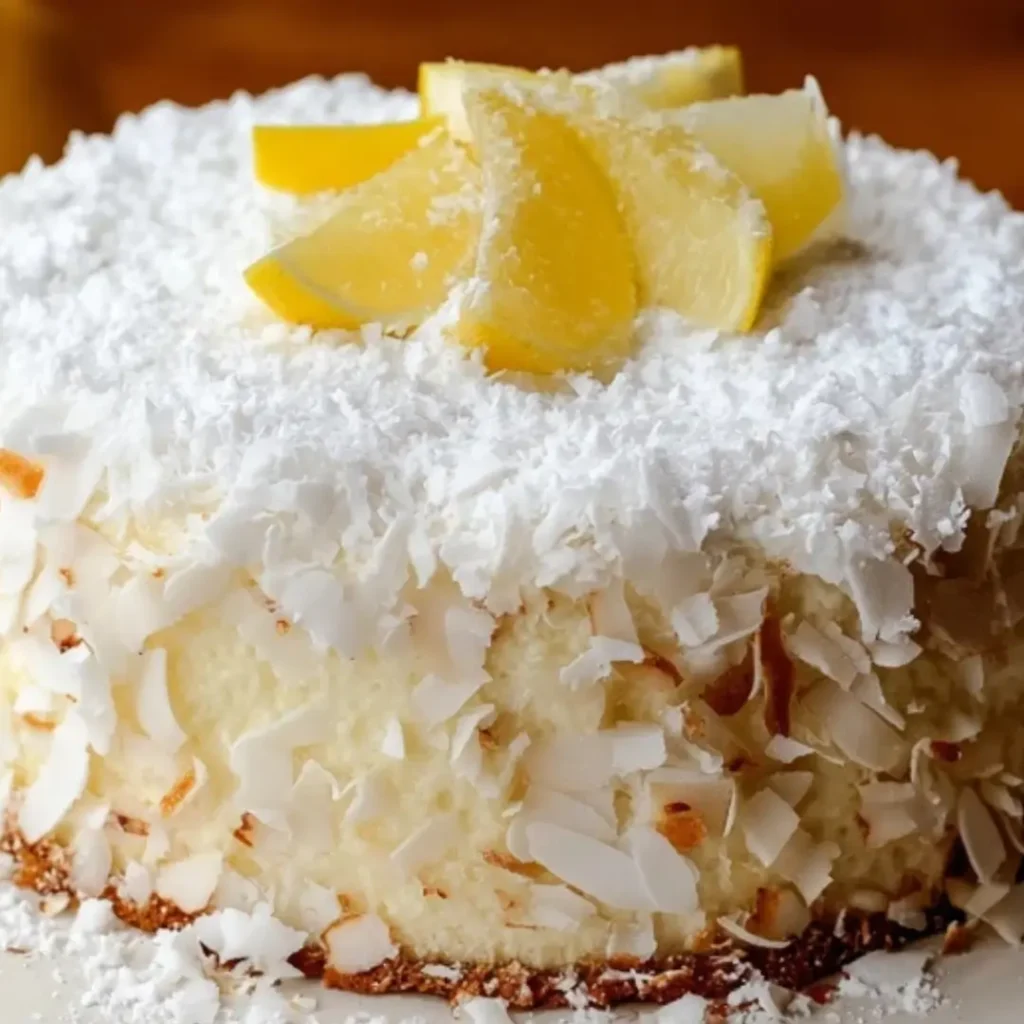
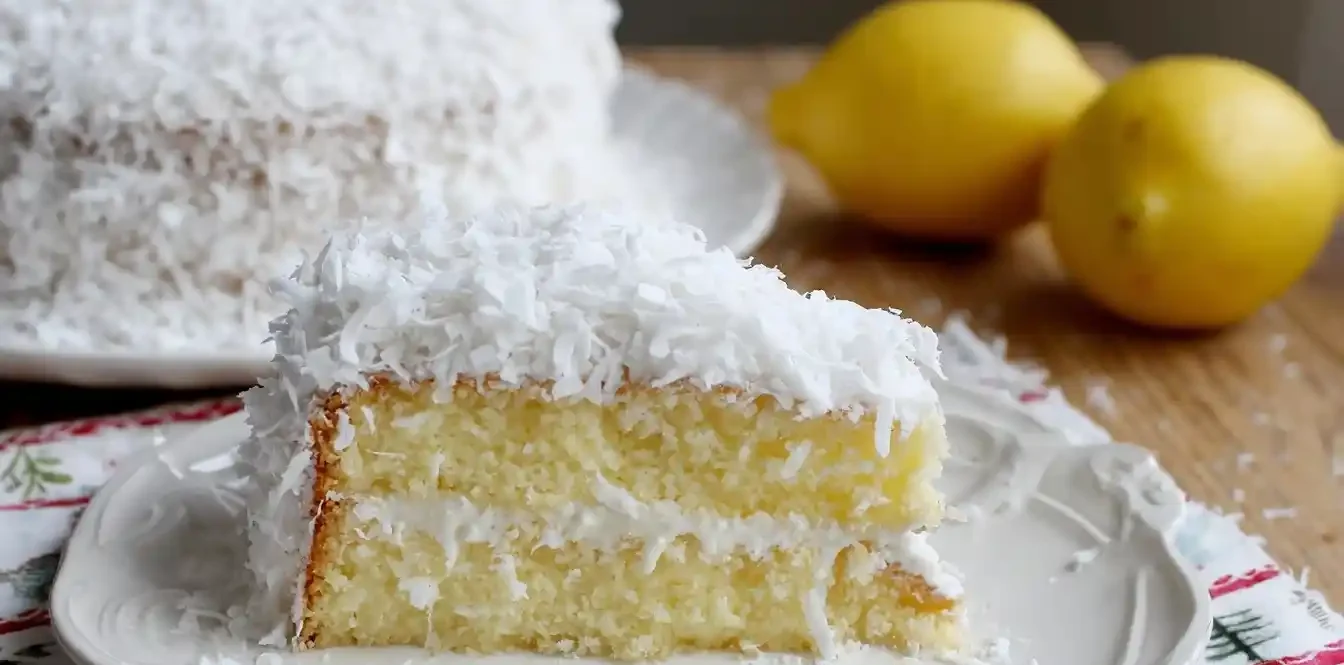
There’s nothing quite like a homemade dessert to bring warmth and joy to any occasion. Today, I’m sharing a recipe for our delightful Coconut Lemon Cream Snow Cake. It’s a truly magical treat, marrying tender coconut cake layers with a zesty lemon cream, all enveloped in a dreamy, snow-like frosting. This cake is pure bliss!
I often recall childhood afternoons in my grandmother’s kitchen, the scent of baking filling the air. Her patience taught me that with a little love, simple ingredients become extraordinary. This recipe is a culmination of those precious lessons and years of my own kitchen adventures.
The Coconut Lemon Cream Snow Cake is wonderfully easy to master and perfect for creating new family memories. My best tip for you? Always use fresh lemon zest and juice; it elevates the flavor profile immensely!
What You Need to Make This Recipe
For our delightful Coconut Lemon Cream Snow Cake, you’ll need pantry essentials: flour, butter, sugar, and full-fat coconut milk. Fresh lemon zest provides that bright tang. I always use pure vanilla extract for deep, comforting flavor. All measurements are in the recipe card below.
How to Make Coconut Lemon Cream Snow Cake
Crafting this delightful dessert involves four key steps. First, prepare the tender coconut cake layers. Next, create the bright lemon cream filling. Then, whip up the fluffy coconut snow frosting. Finally, carefully assemble the entire Coconut Lemon Cream Snow Cake, layering each component to create a truly magical, homemade masterpiece ready to impress!
Coconut Lemon Cream Snow Cake
Ingredients
Equipment
Method
- Preheat oven to 350°F (175°C). Grease and flour two 8-inch round cake pans, then line the bottoms with parchment paper.
- In a medium bowl, whisk together the flour, baking powder, and salt. Set aside.
- In a large mixing bowl with an electric mixer, cream together the softened butter and granulated sugar on medium-high speed until light and fluffy, about 3-5 minutes.
- Gradually add the egg whites, one at a time, beating well after each addition until fully incorporated. Scrape down the sides of the bowl as needed.
- In a separate small bowl, combine the coconut milk, vanilla extract, and lemon zest.
- Alternately add the dry ingredients and the wet ingredients to the butter mixture, beginning and ending with the dry ingredients (add about 1/3 dry, then 1/2 wet, 1/3 dry, 1/2 wet, 1/3 dry). Mix on low speed until just combined, being careful not to overmix.
- Divide the batter evenly between the two prepared cake pans.
- Bake for 28-32 minutes, or until a wooden skewer inserted into the center comes out clean.
- Let the cakes cool in the pans for 10-15 minutes before inverting them onto a wire cooling rack to cool completely. This is crucial before frosting, typically 1-2 hours.
- In a medium mixing bowl with an electric mixer, beat the softened cream cheese and butter on medium speed until smooth and creamy.
- Gradually add the sifted powdered sugar, beating until fully incorporated.
- Add the fresh lemon juice, lemon zest, and vanilla extract. Beat on medium-high speed until the filling is light, fluffy, and smooth, about 2-3 minutes.
- In a large mixing bowl with an electric mixer, beat the softened butter on medium speed until creamy, about 2 minutes.
- Gradually add the sifted powdered sugar, 1 cup at a time, beating on low speed until combined, then increase to medium speed.
- Once all the sugar is added, beat in the coconut milk and vanilla extract until the frosting is light, fluffy, and smooth. If too thick, add a tiny bit more coconut milk (1 tsp at a time); if too thin, add more powdered sugar.
- Once the cake layers are completely cool, place one cake layer on your serving plate or cake stand.
- Spread about half of the Lemon Cream Filling evenly over the top of the first cake layer.
- Carefully place the second cake layer on top.
- Spread the remaining Lemon Cream Filling over the second layer, leaving a small border around the edge, as this filling is internal.
- Frost the entire cake (top and sides) with the Coconut Snow Frosting using an offset spatula.
- Gently press the shredded unsweetened coconut onto the sides and top of the cake, creating a “snow” effect. You can use your hands or a spatula to help adhere the coconut.
- Chill the cake for at least 30 minutes before slicing and serving to allow the frosting and filling to set.
Notes
Pro Tips for Making This Coconut Lemon Cream Snow Cake
- Room Temperature Ingredients are Key: This is a golden rule for your Coconut Lemon Cream Snow Cake! Ensure butter, cream cheese, and egg whites are at room temperature. Proper emulsification creates smooth batter and silky frosting, making a world of difference for texture.
- Don’t Overmix the Batter: Once dry ingredients are added, mix just until combined. Overmixing develops gluten, leading to a dense cake. Gentle hands ensure light, airy, tender layers.
- My Secret Trick: When zesting lemons, use a microplane for only the yellow part. The white pith is bitter. We want pure, bright lemon flavor to truly sing in our lemon cream, enhancing the cake’s vibrancy.
- Chill Your Layers: After baking and cooling, wrap cake layers and chill for at least 30 minutes. Cold layers are much easier to handle, level, and frost, making assembly a breeze.
Fun Variations for Coconut Lemon Cream Snow Cake
One of the beauties of home baking is making a recipe your own, and this Coconut Lemon Cream Snow Cake is wonderfully adaptable! Don’t be shy about adding your personal touch.
Tropical Twist
For an exotic flavor, add a layer of finely diced mango or pineapple compote between cake layers. My sister loves passion fruit puree swirled in – it adds delightful tartness complementing the coconut beautifully!
Berry Delight
Fresh berries pair wonderfully with lemon. Arrange raspberries or blueberries on the lemon cream filling. The vibrant colors and burst of fruitiness are simply divine. A friend loves extra berries and a mint sprig.
Nutty Indulgence
If you enjoy crunch, lightly toast slivered almonds or macadamia nuts. Sprinkle them between cake layers or around the base. This adds lovely texture and a subtle nutty flavor that pairs well with the coconut and lemon of the Coconut Lemon Cream Snow Cake.
What to Serve With Coconut Lemon Cream Snow Cake
Serving a beautiful Coconut Lemon Cream Snow Cake is an occasion in itself, and I love thinking about how to make the entire dessert experience feel complete!
- A Warm Brew: A freshly brewed cup of herbal tea or light roast coffee perfectly complements the delicate flavors of the Coconut Lemon Cream Snow Cake without overpowering. It’s my favorite pairing for any afternoon treat!
- Fresh Berries: A simple bowl of mixed fresh berries adds a lovely tart counterpoint and vibrant color. Their natural sweetness beautifully enhances the cake’s flavors.
- Lightly Whipped Cream: A dollop of homemade, lightly sweetened whipped cream alongside a slice is heavenly. It adds an ethereal touch that melts in your mouth.
- A Scoop of Sorbet: For a truly refreshing experience, a small scoop of raspberry or mango sorbet is delightful. It’s a lighter alternative, bringing another layer of fruity brightness.
How to Store Coconut Lemon Cream Snow Cake
After all that love goes into creating your Coconut Lemon Cream Snow Cake, you want to ensure any leftovers stay just as fresh and delicious! Proper storage is key to preserving its wonderful texture and flavor.
Refrigerator Storage
This Coconut Lemon Cream Snow Cake, with its cream cheese and lemon cream filling, needs refrigeration. Store leftovers in an airtight container for up to 3-4 days. This keeps it moist and prevents fridge odors.
Freezer Friendly?
Yes! For longer storage, individual slices or unfrosted cake layers can be wrapped tightly in plastic, then foil. Freeze for up to 2-3 months. Thaw frozen slices in the refrigerator overnight.
Serving Leftovers
I always recommend bringing chilled slices to room temperature (15-20 minutes) before serving. This softens layers and makes the lemon cream perfectly yielding. A light dusting of powdered sugar makes it special again!
Nutritional Benefits
Our Coconut Lemon Cream Snow Cake, while a treat, incorporates lovely elements! Full-fat coconut milk provides healthy fats, and fresh lemon zest offers Vitamin C and antioxidants. It’s a sweet reminder that even desserts can offer natural goodness when crafted with simple ingredients.
FAQs
Can I make this Coconut Lemon Cream Snow Cake ahead of time?
Yes! Bake cake layers a day ahead, wrapped tightly. The lemon cream filling can also be prepared and chilled. For peak freshness, assemble your Coconut Lemon Cream Snow Cake on serving day. This ensures every bite is as delightful as intended.
What kind of coconut milk should I use for this recipe?
For the Coconut Lemon Cream Snow Cake, use full-fat coconut milk from a can. The thick cream is essential for moist cake layers and the fluffy coconut snow frosting. Do not use the thinner, refrigerated beverage coconut milk for this recipe’s success.
Can I substitute the lemon for another citrus in this recipe?
Yes! Lime offers a zesty, tropical twist, or use orange for a sweeter, milder note. Always use both fresh zest and juice for the best flavor. This allows you to easily personalize your Coconut Lemon Cream Snow Cake to suit your taste preferences.
How do I get the “snow” effect for the frosting on this cake?
To get the “snow” effect for your Coconut Lemon Cream Snow Cake, generously press shredded unsweetened coconut onto the frosted exterior. This creates a beautiful, textured, and whimsical finish, making your dessert visually stunning and wonderfully inviting for all.
Conclusion
Baking is truly an act of love, and I hope this Coconut Lemon Cream Snow Cake recipe inspires you to create something truly special in your own kitchen. This cake, with its delicate coconut layers, bright lemon cream, and snowy frosting, is more than just a dessert; it’s a centerpiece for conversations, a reason for smiles, and a sweet way to make lasting memories. Gather your ingredients, put on your apron, and embrace the joy of homemade goodness. Happy baking, sweet friends!