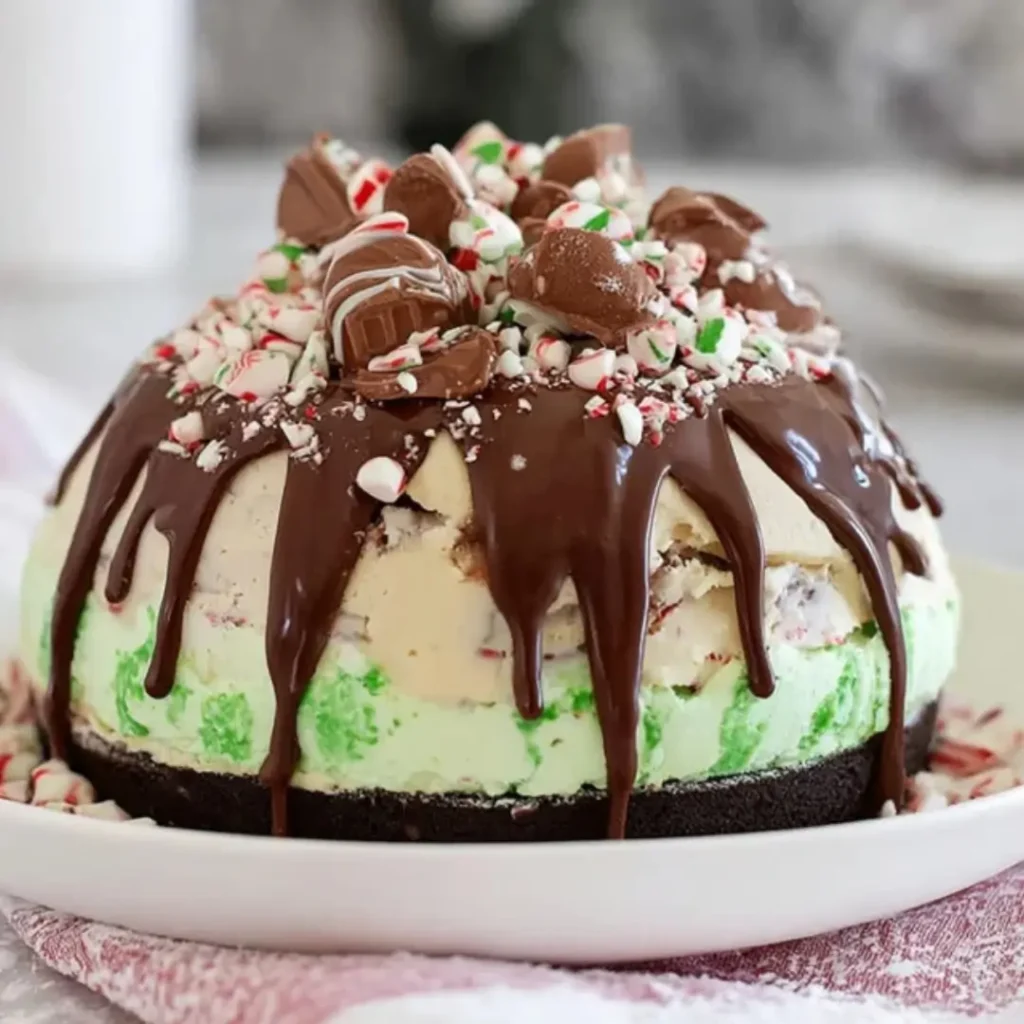
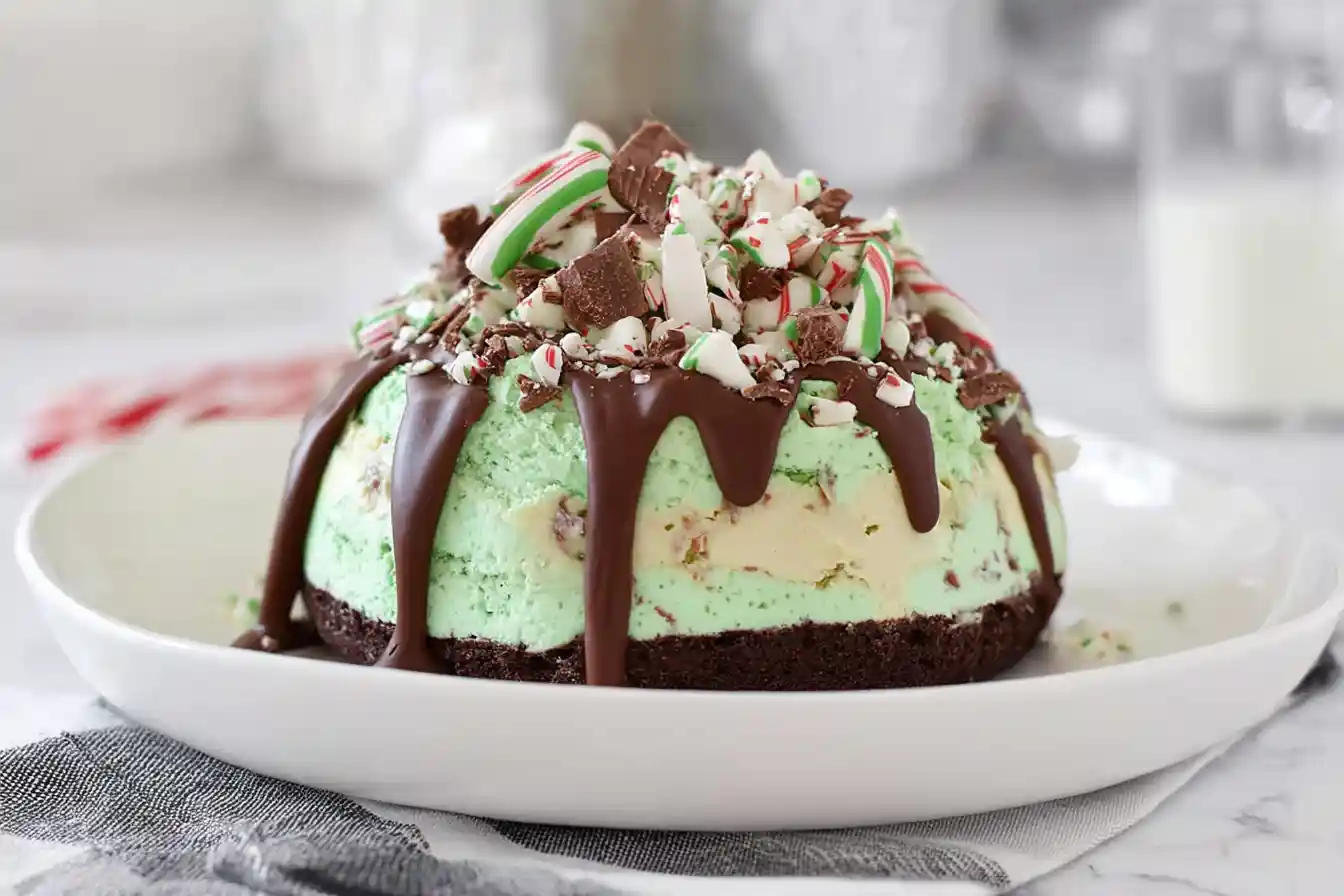
There’s something truly magical about a homemade dessert, isn’t there? Especially when it brings together the cool, festive joy of peppermint with the rich indulgence of chocolate. This Christmas Peppermint Ice Cream Cake is just that—a dazzling yet surprisingly simple creation that tastes like a winter wonderland in every spoonful. Imagine velvety vanilla peppermint ice cream layered over a crunchy Oreo crust, all crowned with a fluffy whipped cream topping. It’s a treat that embodies the spirit of the season, a true showstopper for any holiday gathering.
I remember chilly December afternoons in my grandmother’s kitchen, the scent of vanilla and sugar filling the air as we’d bake together. She always taught me that the best desserts are made with love and a sprinkle of festive cheer. This ice cream cake brings back those cherished memories, reminding me of the pure delight of sharing something sweet and special with the ones you hold dear.
This recipe is not only incredibly easy to prepare, making it perfect for busy holiday schedules, but it’s also a fantastic make-ahead dessert, allowing you to enjoy more time with your loved ones. My top tip? Don’t rush the freezing steps; patience is truly a virtue when creating layers of frozen perfection!
What You Need to Make This Recipe
Crafting this delightful ice cream cake relies on a few simple stars, including crunchy chocolate sandwich cookies for our irresistible crust, and pure peppermint extract to infuse our creamy vanilla ice cream with that signature holiday flavor. I always suggest using a good quality heavy cream for the topping, as it makes all the difference in achieving that dreamy, stable whipped texture. You’ll find all the specific measurements and a complete list of ingredients in the recipe card just below. This Christmas Peppermint Ice Cream Cake comes together with such beautiful simplicity!
How to Make Christmas Peppermint Ice Cream Cake
Creating this beautiful dessert is a joyful journey in three simple acts: first, we prepare the delightful chocolate cookie crust, a foundation of crunchy perfection. Then, we mix up the creamy peppermint ice cream layer, swirling in festive colors and crushed candy canes. Finally, we crown it all with a luscious whipped cream topping before freezing to frozen perfection. It’s a process that feels wonderfully intuitive, leading to a truly impressive Christmas Peppermint Ice Cream Cake.
Christmas Peppermint Ice Cream Cake
Ingredients
Equipment
Method
- Lightly grease a 9-inch springform pan. Line the bottom with a circle of parchment paper for easy removal, if desired.
- In a food processor, finely crush the chocolate sandwich cookies until they resemble fine crumbs. Alternatively, place cookies in a large zip-top bag and crush with a rolling pin.
- Transfer cookie crumbs to a medium bowl. Pour in the melted butter and mix well until all crumbs are moistened.
- Press the mixture firmly and evenly into the bottom of the prepared springform pan. Place in the freezer for at least 30 minutes to set while you prepare the ice cream layer.
- In a large mixing bowl, add the slightly softened vanilla ice cream. Stir in the peppermint extract and red food coloring (if using) until evenly combined and the ice cream has a uniform pale pink color.
- Gently fold in 1 cup of crushed candy canes.
- Remove the springform pan with the set crust from the freezer. Spread the peppermint ice cream mixture evenly over the crust. Smooth the top with a spatula.
- Cover the pan tightly with plastic wrap and freeze for at least 4-6 hours, or preferably overnight, until the ice cream is very firm.
- Once the ice cream layer is completely firm, prepare the whipped cream topping. In a large, chilled mixing bowl, combine the cold heavy cream, powdered sugar, and vanilla extract.
- Using an electric mixer, beat on medium-high speed until stiff peaks form.
- Remove the ice cream cake from the freezer. Run a thin knife around the edge of the pan before releasing and removing the springform collar. Gently slide the cake onto a serving plate.
- Spread the whipped cream topping evenly over the top of the ice cream cake. Garnish generously with additional crushed candy canes.
- Return the cake to the freezer for at least 1 hour to allow the whipped cream to firm up. If freezing for longer, cover loosely with plastic wrap.
- To serve, let the cake sit at room temperature for 5-10 minutes to soften slightly, then slice with a sharp, warm knife.
Notes
Over the years, I’ve learned a few little tricks that ensure every dessert turns out perfectly, and this Christmas Peppermint Ice Cream Cake is no exception! These simple tips will help you create a truly spectacular treat that everyone will adore.
Achieving the Perfect Crush
When making your Oreo crust, don’t be shy about crushing those cookies until they’re fine crumbs. I find that using a food processor makes this super quick and easy, ensuring an even crust that holds together beautifully. If you don’t have one, a Ziploc bag and a rolling pin work wonders, too! Just make sure there are no large chunks, as they can make slicing a bit tricky later on.
The Art of Layering
My Secret Trick: For a truly distinct and beautiful ice cream layer, let your vanilla ice cream soften at room temperature for about 15-20 minutes, or until it’s pliable but not melted. This makes it incredibly easy to stir in the peppermint extract and food coloring smoothly, and then spread it evenly over the crust without disturbing it.
Freezing for Success
Patience is your best friend when making ice cream cakes. I always recommend allowing ample freezing time between layers and for the final assembly. For this Christmas Peppermint Ice Cream Cake, ensure each layer is firm before adding the next. This prevents colors from bleeding and ensures a clean, stunning presentation when you slice into it. A solid freeze for at least 6 hours, or even overnight, is ideal for the finished cake.
Whipped Cream Perfection
For your whipped cream topping, make sure both your heavy cream and your mixing bowl are very cold. I often pop my bowl in the freezer for 10-15 minutes before whipping. This helps the cream whip up faster, achieve better volume, and hold its shape beautifully, giving your Christmas Peppermint Ice Cream Cake a truly professional finish.
Fun Variations for This Dessert
One of the joys of baking is making a recipe truly your own! This dessert is wonderfully adaptable, allowing you to play with flavors and textures. Here are a few ideas to get your creative juices flowing for your Christmas Peppermint Ice Cream Cake.
Cookie Crust Creativity
While the Oreo crust is a classic, feel free to experiment! Graham crackers make for a slightly less intense chocolate flavor, or try crushing gingersnaps for a spiced, festive kick that pairs wonderfully with the peppermint. My sister always asks me to use chocolate wafers for an extra rich crust, and it’s always a hit!
Flavor Twists
Instead of just vanilla ice cream, consider a chocolate ice cream base for a double chocolate peppermint dream. Or, for a sophisticated touch, swirl in a little coffee liqueur or a hint of almond extract with the peppermint. A friend loves when I add a layer of hot fudge sauce before the ice cream sets, creating a delightful surprise in the middle!
Topping Extravaganza
Beyond the classic candy cane crunch, think about adding mini chocolate chips, a drizzle of chocolate ganache, or even some festive sprinkles on top. Toasted coconut flakes could add a lovely texture and a hint of tropical flair to the cool peppermint. You can truly make this ice cream cake reflect your personal style!
What to Serve With This Christmas Peppermint Ice Cream Cake
This festive dessert is truly a showstopper on its own, but it also plays beautifully with a few simple accompaniments that enhance its holiday charm. When I’m serving my Christmas Peppermint Ice Cream Cake, I often think about contrasting textures and warming sips that create a cozy, celebratory atmosphere.
For a comforting pairing, I love serving slices alongside a steaming mug of homemade hot cocoa, perhaps topped with extra marshmallows or a dollop of whipped cream. The warmth and creamy chocolate notes are a perfect counterpoint to the cool, refreshing peppermint. Another lovely option is a simple cup of freshly brewed coffee or a specialty tea, like a calming peppermint herbal tea, to round out the meal. For a touch of fruitiness to balance the richness, a small bowl of fresh mixed berries—think raspberries or blueberries—can add a bright, juicy contrast. My mom always pairs it with warm apple cider in winter, and the combination of sweet apples and cool mint is surprisingly delightful!
How to Store This Christmas Peppermint Ice Cream Cake
Ensuring your homemade delights stay fresh and delicious is key, especially with something as special as this ice cream cake! Proper storage will keep your Christmas Peppermint Ice Cream Cake tasting wonderful for days.
Freezer Storage
This ice cream cake is a freezer champion! Once fully assembled and frozen solid, wrap the entire cake tightly in several layers of plastic wrap, then an additional layer of aluminum foil. This double-layer protection is crucial for preventing freezer burn and keeping those festive flavors pristine. Stored this way, your Christmas Peppermint Ice Cream Cake can be kept in the freezer for up to 2-3 weeks.
Serving Leftovers
When you’re ready to enjoy a slice of leftover ice cream cake, simply remove it from the freezer about 10-15 minutes before serving. This brief time at room temperature allows it to soften slightly, making it much easier to slice and ensuring a perfectly creamy texture. I like to keep any remaining slices individually wrapped in plastic film inside an airtight container in the freezer. This way, they’re always ready for a quick, delicious treat!
Nutritional Benefits
While this dessert is undeniably a festive indulgence, it’s worth noting that homemade treats like this Christmas Peppermint Ice Cream Cake often incorporate simple ingredients. With whole milk dairy from the ice cream and whipped cream, you’re getting some protein and calcium. When enjoyed in moderation, it’s a delightful way to satisfy a sweet craving while enjoying the simple goodness of a lovingly prepared treat that’s both satisfying and nourishing for the soul.
FAQs
Can I make this Christmas Peppermint Ice Cream Cake ahead of time?
Absolutely! This is one of the best make-ahead desserts. You can prepare and freeze the entire cake up to 2-3 weeks in advance. Just ensure it’s tightly wrapped to prevent freezer burn and maintain its fresh, festive flavor.
How long does the Christmas Peppermint Ice Cream Cake need to freeze?
Each layer needs to freeze for at least 1-2 hours to firm up before adding the next. The final assembled Christmas Peppermint Ice Cream Cake should freeze for a minimum of 6 hours, but for best results and easy slicing, I recommend freezing it overnight.
Can I use a different type of cookie for the crust?
Yes, feel free to get creative! While chocolate sandwich cookies are classic, you could use graham crackers, chocolate wafers, or even gingersnaps for a spicier, festive crust that complements the peppermint beautifully.
Is this Christmas Peppermint Ice Cream Cake good for a crowd?
Definitely! This recipe yields a generous cake that’s perfect for holiday parties, family gatherings, or any festive celebration. Its impressive appearance and delightful flavor make it a wonderful dessert to share with a crowd.
Conclusion
There you have it, my sweet friends—a recipe for a truly enchanting Christmas Peppermint Ice Cream Cake that promises to bring joy and festive cheer to your holiday table. From the crunchy Oreo crust to the creamy peppermint filling and fluffy whipped topping, every bite is a celebration of simple ingredients transformed into something extraordinary. This is more than just a dessert; it’s an invitation to create new memories, just like the ones I cherish from my grandmother’s kitchen. So, gather your ingredients, put on some festive tunes, and let your heart guide you as you bake. With a little love and patience, you’ll craft a sweet masterpiece that will delight everyone and remind us all of the pure joy of homemade desserts. Happy baking!