There’s something truly magical about a basket of warm, freshly baked dinner rolls gracing the table. Their soft, buttery texture and light-as-a-cloud crumb instantly transport you to a place of comfort and joy. It’s a simple pleasure that elevates any meal, making even an ordinary weeknight feel like a special occasion.
I remember my grandmother’s kitchen, filled with the comforting aroma of yeast and flour as she expertly kneaded dough for her famous rolls. Those afternoons, watching her gentle hands transform simple ingredients into something extraordinary, ignited my lifelong passion for baking. It’s a memory I cherish, a sweet reminder of home and hearth.
These homemade fluffy dinner rolls are incredibly rewarding to bake, offering both a delightful taste experience and the sheer satisfaction of creating something wonderful from scratch. My top tip for perfect rolls? Don’t rush the rising time – patience is truly a baker’s best friend.

What You Need to Make This Recipe
For these delightful dinner rolls, we’re gathering humble heroes like warm milk, active dry yeast, and quality unsalted butter for that signature richness. I always insist on using fresh ingredients! You’ll find the complete list and exact measurements in the recipe card below.
How to Make Dinner Rolls
Crafting these fluffy rolls involves a few simple steps, starting with activating your yeast and mixing the dough until it’s beautifully smooth and elastic. After a cozy rise, you’ll shape them into perfect rounds, let them proof one last time, and then bake them to a golden, irresistible perfection. It’s a process filled with anticipation and pure baking joy!
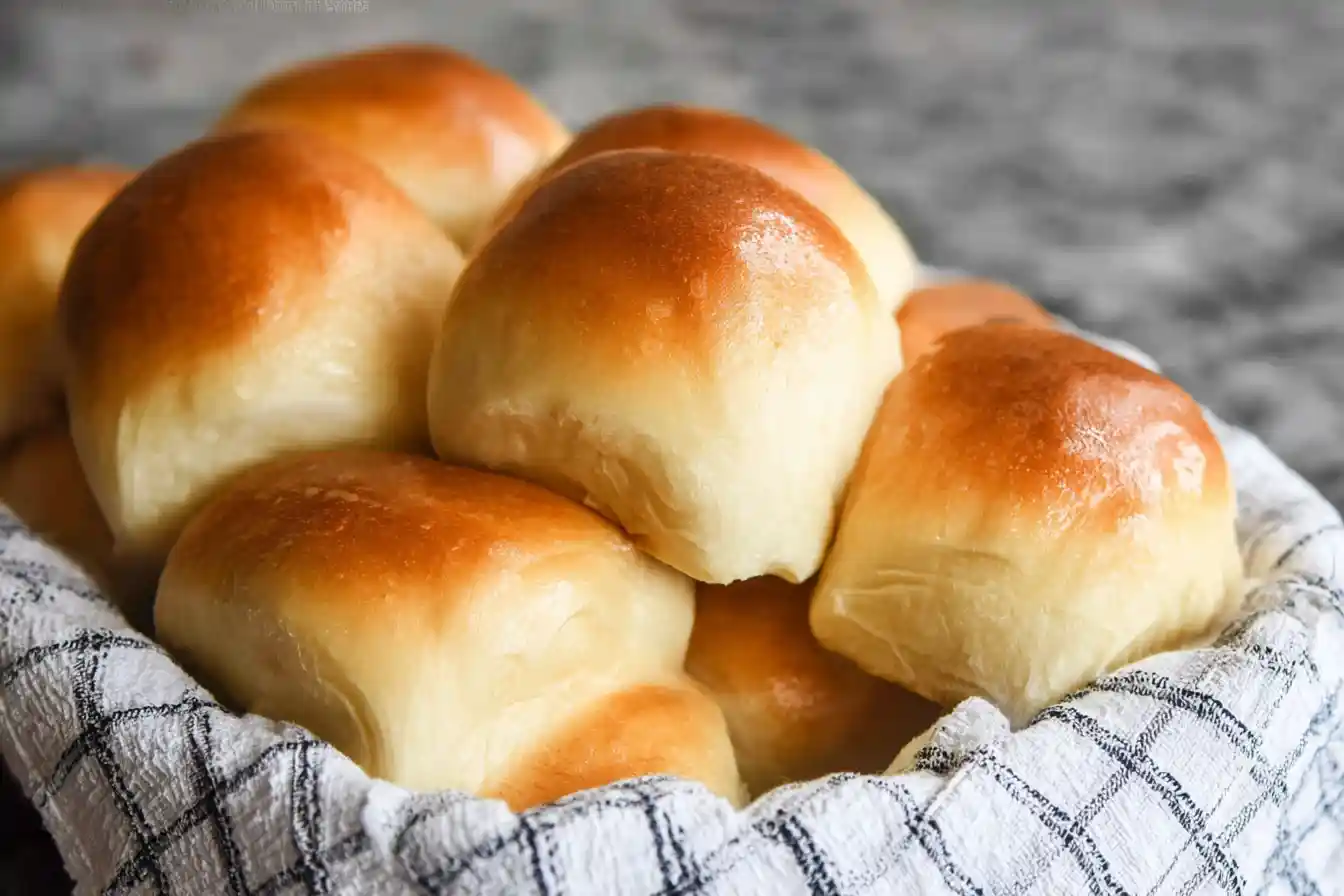
Classic Fluffy Dinner Rolls
Ingredients
Equipment
Method
- In a large mixing bowl (or stand mixer bowl), combine the warm water, 1 tablespoon granulated sugar, and active dry yeast. Stir gently and let sit for 5-10 minutes until the mixture is foamy, indicating the yeast is active. If it doesn’t foam, your yeast may be old or your water not the right temperature; start again.
- To the foamy yeast mixture, add the warm milk, 1/4 cup melted butter, 1/4 cup granulated sugar, salt, and the room temperature egg. Whisk until well combined.
- Gradually add 3 1/2 cups of the all-purpose flour to the wet ingredients, mixing with a wooden spoon or a dough hook on a stand mixer on low speed. Once the dough comes together, increase speed to medium-low and knead for 5-7 minutes, adding up to 1/2 cup more flour if the dough is too sticky, until it’s smooth, elastic, and pulls away from the sides of the bowl. The dough should still be slightly tacky but not sticky.
- Lightly grease a clean large bowl with a little oil. Transfer the dough to the greased bowl, turning once to coat. Cover the bowl tightly with plastic wrap or a clean kitchen towel. Place in a warm, draft-free place for 60-90 minutes, or until the dough has doubled in size.
- Once doubled, gently punch down the dough to release the air. Lightly flour your work surface and turn out the dough. Divide the dough into 16 equal pieces (about 2 oz each). Shape each piece into a smooth, round ball by pinching the seams at the bottom or rolling between your palm and the counter.
- Arrange the shaped rolls in a lightly greased 9×13 inch baking pan, leaving a little space between each. Cover the pan loosely with plastic wrap or a kitchen towel and let rise in a warm place for another 30-45 minutes, or until the rolls are puffy and nearly doubled in size.
- Towards the end of the second rise, preheat your oven to 375°F (190°C). Remove the cover from the rolls and bake for 15-18 minutes, or until golden brown on top and cooked through.
- Once out of the oven, immediately brush the tops of the hot rolls with the remaining 2 tablespoons of melted unsalted butter. This adds flavor and gives them a beautiful shine.
- Let the rolls cool in the pan for a few minutes before serving warm. Enjoy!
Notes
Pro Tips for Making This Dinner Rolls
Achieving the perfect, pillowy texture for your dinner rolls is simpler than you might think with a few of my tried-and-true baking secrets.
Always ensure your milk and water are truly warm, not hot. Too hot and it can kill your yeast, leaving you with dense rolls. I like to aim for a temperature similar to a warm bath – comfortable to the touch.
Kneading is crucial! Don’t be afraid to really work that dough. It develops the gluten, which is what gives these buttery rolls their incredible elasticity and chew. I usually knead for 8-10 minutes, until the dough is smooth and springs back slowly when poked.
My Secret Trick: I always brush my freshly baked dinner rolls with a little melted unsalted butter as soon as they come out of the oven. This adds an extra layer of richness, a beautiful sheen, and helps keep them incredibly soft.
Finally, resist the urge to peek too often while your rolls are rising. A consistent, warm environment is key for a proper rise. I often turn my oven on to the lowest setting for a few minutes, then turn it off and let the dough rise inside with the door slightly ajar.
Fun Variations for Dinner Rolls
Baking these classic dinner rolls is wonderful, but sometimes it’s fun to add a little twist! Here are a few ways I love to play with the recipe to keep things exciting:
Herb & Garlic Rolls
For a savory spin, I often knead in a tablespoon of finely minced fresh rosemary or chives, along with a teaspoon of garlic powder, into the dough during the last few minutes of kneading. My friend, Martha, absolutely adores these with her roasted chicken!
Cheesy Pull-Apart Rolls
Before the second rise, flatten each dough ball slightly and tuck a small cube of cheddar or mozzarella cheese inside, then reshape. As they bake, the cheese melts, creating a delightful gooey center. These are always a hit at potlucks!
Sweet Cinnamon Swirl Rolls
For a delightful breakfast or dessert treat, roll out the dough after the first rise into a rectangle. Spread with softened butter, a sprinkle of cinnamon sugar, and a handful of raisins. Roll it up, slice, and bake as usual. My nephew thinks these are even better than cinnamon buns!
What to Serve With Dinner Rolls
These fluffy dinner rolls are incredibly versatile and truly shine alongside so many dishes. While they’re perfect on their own, pairing them can elevate any meal.
I love serving them with a hearty soup, especially a creamy tomato bisque, for a comforting and satisfying lunch. My husband always insists on a generous smear of butter, or even a little homemade jam for a delightful sweet-and-savory contrast.
For a quick serving idea, simply warm them up gently and offer a small dish of herbed butter – just mix softened butter with finely chopped chives, parsley, and a pinch of garlic powder. It’s a simple touch that makes these homemade rolls feel extra special. They also pair wonderfully with stews, roasts, or any holiday spread.
How to Store Dinner Rolls
Keeping your beautiful dinner rolls fresh and soft for as long as possible is easy with a few simple tricks. Proper storage ensures they retain their wonderful texture and flavor.
Fridge Storage & Reheating
Store cooled dinner rolls in an airtight container or a large zip-top bag at room temperature for up to 2-3 days. For longer storage, refrigerate them for up to a week. To reheat, wrap them in foil and warm in a 300°F (150°C) oven for about 10-15 minutes, or microwave briefly until just warm. My personal tip: a light sprinkle of water before microwaving helps keep them incredibly moist!
Freezing for Freshness
These rolls freeze beautifully! Once completely cooled, place them in a freezer-safe bag, pressing out as much air as possible. They’ll keep well for up to 3 months. Thaw at room temperature, then reheat as directed for refrigerated rolls. There’s nothing like having homemade dinner rolls ready to go!
Nutritional Benefits
While we cherish the joy these fluffy dinner rolls bring, it’s lovely to know they offer some simple goodness. Made with wholesome flour, milk, and eggs, they provide energy and contribute to your daily grain intake—a satisfying and nourishing treat.
FAQs
Faq 1
Why didn’t my dinner rolls rise properly?
The most common reasons are inactive yeast or water that’s too hot or cold. Always check your yeast’s expiration date and ensure your warm water is between 105-115°F (40-46°C) for best results. Patience is key for light, airy dinner rolls!
Faq 2
Can I make the dinner roll dough ahead of time?
Absolutely! You can prepare the dough up to the first rise, then punch it down, cover tightly, and refrigerate overnight (up to 24 hours). Let it come to room temperature for about an hour before shaping and continuing with the recipe for your delicious dinner rolls.
Faq 3
What kind of flour is best for these dinner rolls?
All-purpose flour works beautifully for these soft and fluffy dinner rolls. For a slightly chewier texture, you could experiment with bread flour, but ensure you adjust the liquid slightly as bread flour absorbs more. I find all-purpose gives the perfect light crumb.
Faq 4
How can I make my dinner rolls extra buttery?
Beyond brushing with melted butter after baking, you can also gently knead a tablespoon or two of softened butter into the dough right before the first rise. This adds an incredible richness and tenderness to your finished dinner rolls.
Conclusion
There you have it, my friends – the path to creating the most wonderfully soft, buttery, and light homemade dinner rolls right in your own kitchen. This recipe isn’t just about baking; it’s about bringing warmth, comfort, and joy to your table, creating those precious memories that only homemade food can inspire. I truly hope you find as much delight in baking and sharing these fluffy rolls as I do. Happy baking, and may your kitchen always be filled with sweet aromas and loving moments!