Oh, my dears, there’s truly nothing quite like the comforting aroma of a warm Skillet Apple Crisp wafting through the kitchen. It’s a dessert that speaks of cozy afternoons and sweet family gatherings, a symphony of tender, spiced apples bubbling beneath a golden, toasted oat topping. The contrast of the soft fruit with the crunchy, buttery crisp is pure magic, a simple pleasure that tastes like a hug from the inside out.
My grandmother always said the best desserts are made with love, and I remember countless childhood hours spent by her side, watching her transform humble apples into something extraordinary. That warmth, that simple joy of creating, has stayed with me, guiding my own journey through years of baking triumphs and a few charming mishaps too! This recipe, perfected through many happy experiments, truly embodies that spirit.
This Skillet Apple Crisp is not only wonderfully easy to bake but also incredibly versatile, making it perfect for both weeknight dinners and special celebrations. It’s a family-friendly favorite that consistently brings smiles to every face. My top tip? Always use a blend of apples for a more complex flavor profile!
What You Need to Make This Recipe
Crafting this delightful Skillet Apple Crisp relies on a few wholesome ingredients that transform into something truly special. We’re talking crisp Granny Smith apples, brown sugar for that deep caramel note, and a generous amount of rolled oats for the irresistible, crunchy topping. I always find that using good quality unsalted butter makes all the difference, bringing a richness that store-bought simply can’t match. You’ll find the full list of ingredients and precise measurements in the recipe card below, ready to guide your baking adventure.
How to Make Skillet Apple Crisp
Making this Skillet Apple Crisp is a joyful journey that unfolds in just a few straightforward steps. First, you’ll prepare the fragrant apple filling right in your skillet, letting those beautiful fruit flavors meld with warm spices. Next, you’ll quickly whip up the buttery, toasted oat topping, bringing together oats, flour, and brown sugar. Finally, everything comes together in the pan, ready to bake to golden perfection, filling your home with the most wonderful aroma as it transforms into a bubbling, irresistible dessert.
Skillet Apple Crisp
Ingredients
Equipment
Method
- Preheat your oven to 375°F (190°C).
- In a large mixing bowl, combine the sliced apples, 1/4 cup granulated sugar, 1/4 cup light brown sugar, 1 tablespoon all-purpose flour, 1 teaspoon ground cinnamon, 1/4 teaspoon ground nutmeg, 1/4 teaspoon salt, and 1 tablespoon lemon juice. Toss gently to ensure the apples are evenly coated.
- Melt the 2 tablespoons of unsalted butter in a 10-inch cast iron skillet over medium heat on the stovetop. Once melted, add the apple mixture to the skillet, spreading it into an even layer.
- In a separate medium bowl, combine 1 cup all-purpose flour, 1/2 cup rolled oats, 1/2 cup light brown sugar, 1/4 cup granulated sugar, 1/2 teaspoon ground cinnamon, and 1/4 teaspoon salt. Whisk or stir these dry ingredients thoroughly to combine.
- Add the cold, cubed butter to the dry ingredients. Use a pastry blender, your fingertips, or two forks to cut the butter into the mixture until it resembles coarse crumbs with some pea-sized pieces remaining. This creates the signature crisp texture.
- Evenly sprinkle the prepared crisp topping over the apple filling in the skillet.
- Transfer the skillet to the preheated oven and bake for 35-40 minutes, or until the apples are tender when pierced with a fork, the filling is bubbling around the edges, and the topping is golden brown and delightfully crisp. If the topping begins to brown too quickly, you can loosely tent the skillet with aluminum foil.
- Carefully remove the skillet from the oven and let it cool for at least 10-15 minutes before serving. This allows the hot apple filling to set slightly.
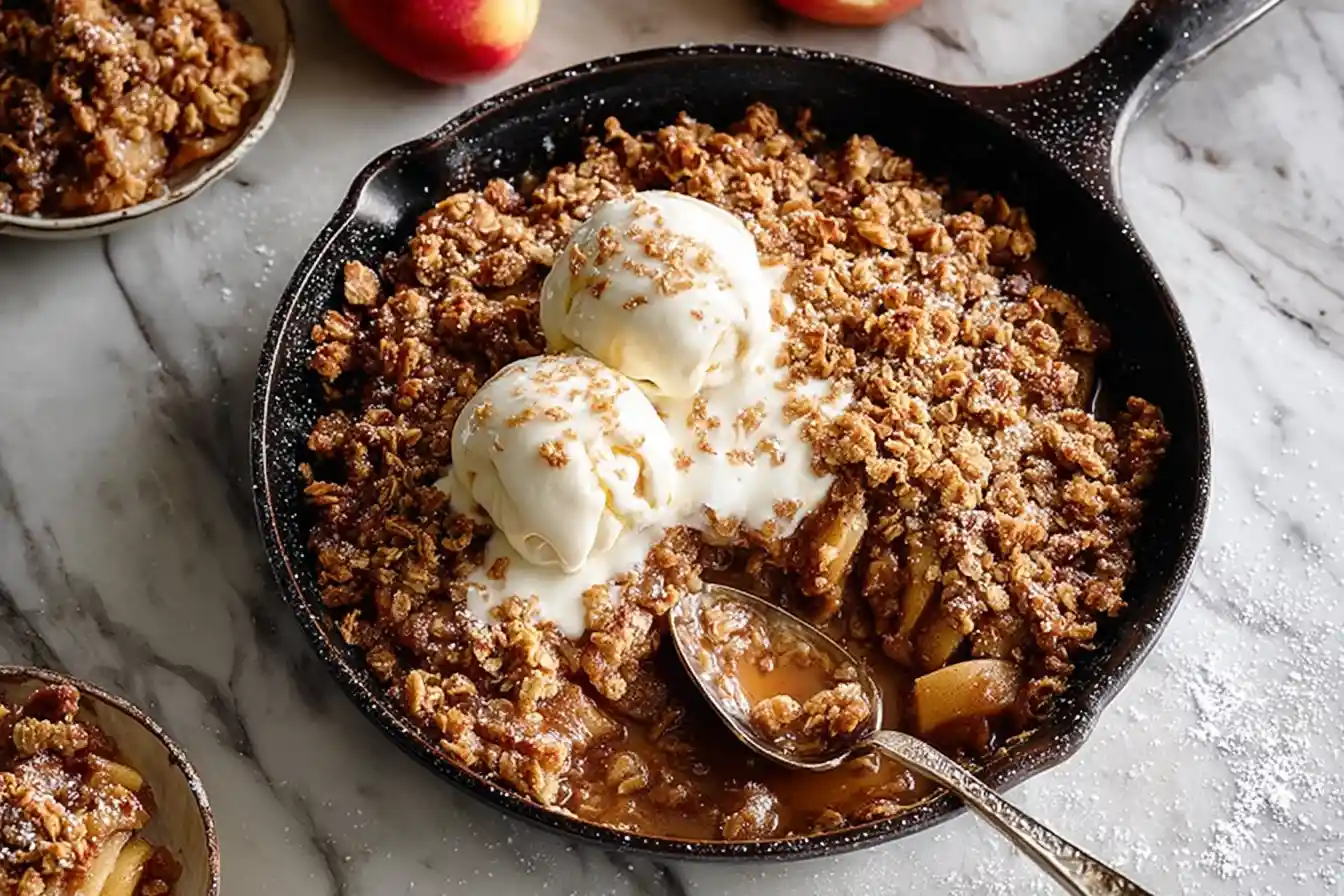
- Serve warm, optionally with a generous scoop of vanilla ice cream or a dollop of freshly whipped cream for an extra treat.
Notes
Pro Tips for Making This Skillet Apple Crisp
Creating a truly memorable Skillet Apple Crisp is all about those little touches that elevate it from good to absolutely glorious. I’ve learned a few tricks over the years that I’m so excited to share with you, ensuring your crisp turns out perfectly every time.
Firstly, don’t be shy with your apples! While Granny Smiths offer that lovely tartness, I always recommend mixing them with a sweeter variety like Honeycrisp or Fuji. This balance of sweet and tart gives the apple filling a wonderful depth and complexity that just sings.
My Secret Trick: I always pre-cook my apples for just a few minutes in the skillet before adding the topping. This ensures they soften beautifully and are perfectly tender when the crisp comes out of the oven, rather than being undercooked. It makes all the difference!
For that perfectly golden and crunchy topping, make sure your butter is truly cold when you mix it with the dry ingredients. This helps create those lovely crumbles that bake up crisp and golden, not soggy. Don’t overmix; gentle handling keeps the topping light and crumbly, giving this Skillet Apple Crisp its signature texture.
Finally, resist the urge to peek too often! Let your Skillet Apple Crisp bake undisturbed for most of the cooking time. The magic happens in the oven, and a steady temperature helps everything caramelize beautifully. Once the topping is golden brown and the apples are bubbling, it’s ready for its grand debut!
Fun Variations for Skillet Apple Crisp
One of the things I adore most about baking is the freedom to get creative, and this Skillet Apple Crisp recipe is a wonderful canvas for your imagination! You can easily adapt it to suit your cravings or what you have on hand, always resulting in a delightful dessert.
Seasonal Fruit Twists
Why stop at apples? This crisp topping is absolutely divine with other fruits! In the summer, I love using a mix of berries like raspberries and blueberries, or even ripe peaches for a truly summery treat. For an autumn twist, pears work beautifully, especially when combined with a touch of ginger in the filling.
Nutty Crunch
For an extra layer of texture and flavor, try adding some chopped nuts to your crisp topping. My sister always asks me to swirl in toasted pecans or walnuts; they add a delightful crunch and a warm, earthy note that complements the apples perfectly. A sprinkle of sliced almonds also works wonders, especially if you toast them lightly beforehand.
A Hint of Citrus
To brighten up the apple filling, a touch of orange zest can be absolutely transformative. It adds a subtle, fragrant lift that really makes the apple flavors pop. I’ve found that a friend loves when I include a tiny splash of orange liqueur too, for a sophisticated touch in her Skillet Apple Crisp. It’s all about experimenting and finding what you love!
What to Serve With Skillet Apple Crisp
Ah, the delightful dilemma of what to pair with a warm, bubbling Skillet Apple Crisp! For me, it’s like choosing the perfect accompaniment to a favorite song – it just makes the whole experience sing.
My absolute go-to, the classic pairing that truly brings out the best in this sweet treat, is a generous scoop of vanilla bean ice cream. The cold, creamy sweetness melting into the warm, spiced apples and crunchy topping is simply heavenly. It’s a combination that never fails to evoke pure bliss.
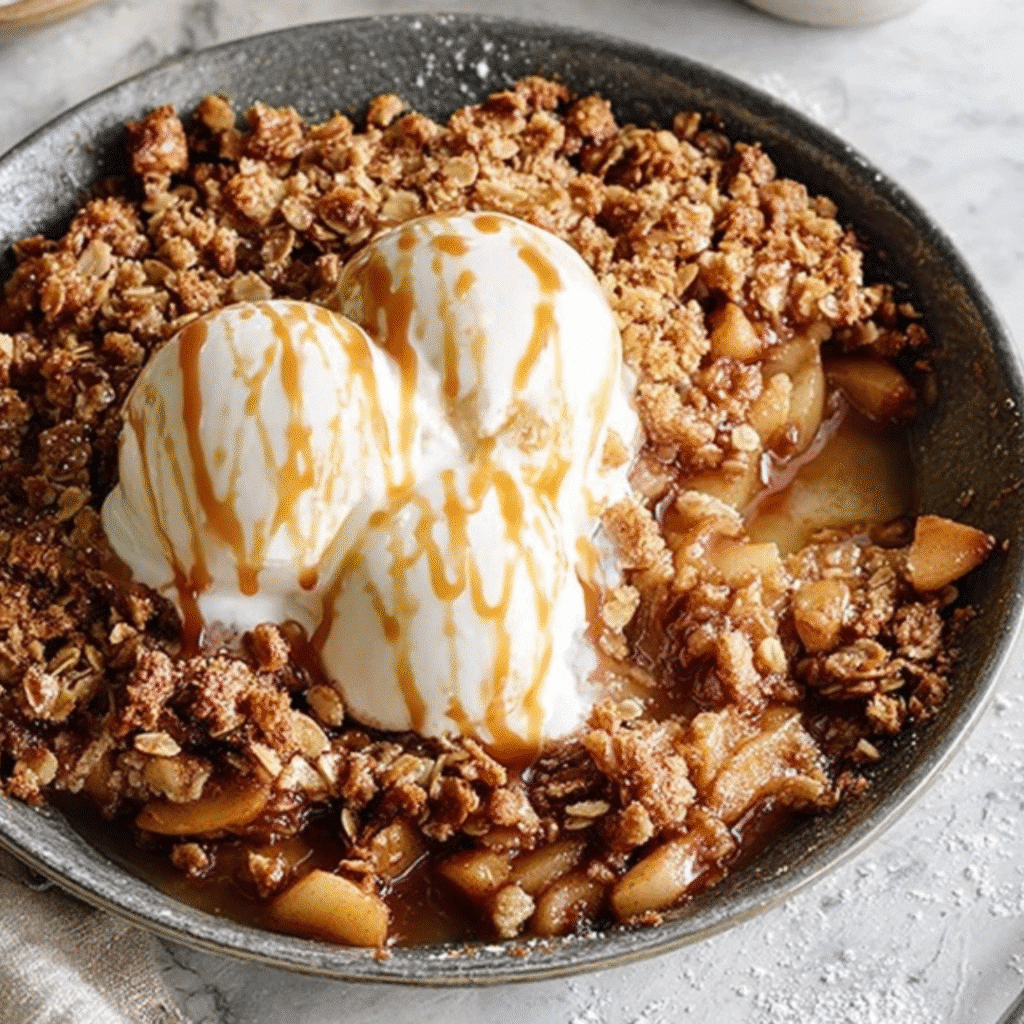
For something a little different, especially if you’re leaning into those cozy autumn vibes, a dollop of freshly whipped cream with a sprinkle of cinnamon is simply divine. And if you’re feeling extra indulgent, a drizzle of warm caramel sauce over the top of your Skillet Apple Crisp elevates it to a whole new level of decadence. My mom always pairs it with a steaming cup of Earl Grey tea in the evenings, which is wonderfully comforting.
How to Store Skillet Apple Crisp
After all the love you’ve poured into making your delicious Skillet Apple Crisp, it’s important to know how to keep any leftovers tasting just as wonderful. Proper storage ensures that delightful flavor and texture remain, so you can enjoy every last bite!
Fridge Storage
Once your Skillet Apple Crisp has cooled completely to room temperature, cover the skillet tightly with aluminum foil or transfer any leftovers to an airtight container. It will keep beautifully in the refrigerator for up to 3-4 days. I always find that placing a sheet of parchment paper directly on top of the crisp before sealing can help prevent it from getting soggy.
Reheating for Freshness
To reheat, simply pop individual servings in the microwave for a minute or two until warmed through. For a crispier topping, I like to warm the entire skillet (or transferred portions) in a preheated oven at 350°F (175°C) for about 10-15 minutes, until bubbly and the topping is restored to its former glory. A light dusting of powdered sugar after reheating brings it back to life!
Nutritional Benefits
While this Skillet Apple Crisp is undoubtedly a delightful indulgence, it also comes with some lovely nutritional benefits thanks to its wholesome ingredients. The star, apples, are packed with dietary fiber and Vitamin C, contributing to a satisfying treat that also supports good digestion. Combined with the oats, which offer complex carbohydrates and even more fiber, it truly is a treat that’s both satisfying and nourishing, embodying my approach of finding balance in our dessert creations.
FAQs
Faq 1
Can I make this Skillet Apple Crisp ahead of time?
Absolutely! You can prepare the apple filling and the crisp topping separately and store them in the refrigerator. Assemble and bake just before serving for the freshest taste and texture. This makes entertaining a breeze!
Faq 2
What kind of skillet should I use for this recipe?
A cast-iron skillet is ideal for this Skillet Apple Crisp as it distributes heat evenly and retains it beautifully, leading to wonderfully cooked apples and a perfectly crisp topping. An oven-safe skillet will also work.
Faq 3
My crisp topping isn’t getting crunchy. What went wrong?
Ensure your butter is very cold and cut into small pieces when making the topping. Also, avoid overmixing. Baking until truly golden brown and bubbly, possibly on a higher rack, will also help achieve that desired crunch for your Skillet Apple Crisp.
Faq 4
Can I freeze leftover Skillet Apple Crisp?
Yes, you can! Once cooled, cover the skillet tightly with foil or transfer portions to an airtight, freezer-safe container. It will keep for up to 3 months. Thaw in the refrigerator overnight before reheating.
Conclusion
There’s a special kind of contentment that comes from pulling a warm, bubbling Skillet Apple Crisp from the oven. It’s more than just a dessert; it’s an invitation to gather, to share stories, and to create beautiful new memories around the table. This recipe, with its tender spiced apples and irresistible toasted oat topping, truly embodies the joy of homemade baking. So, my dear friends, I wholeheartedly encourage you to roll up your sleeves, embrace the warmth of your kitchen, and experience the simple magic of baking this delightful crisp. It’s a sweet reward that tastes like home, crafted with love, just for you.